**most of my plant culture information comes from Wikipedia entries, opinions are all my own though.
Lactuca sativa, or lettuce, is a member of the Asteraceae family and actually makes a pretty little white or yellow flower similar to a dandelion if you allow it to bolt and go to seed. When cut its stems ooze a milky white substance, hence the reason for the name Lactuca. Some members of the Lepidoptera butterfly family eat lettuce. In Ancient Egypt lettuce was considered an aphrodisiac.
Lettuce grows best in a humus rich, light soil, with constant moisture. Lettuce prefers temperatures between 75 degrees and 45 degrees F. A hot or dry environment may cause it to turn bitter and bolt, though this is less of a problem with certain bolt-resistant or heat-tolerant varieties. Seeds can be direct sown into the garden or transplanted. With a protective cover to keep lettuce from freezing it can be grown in mild climates nearly year round.
The primary types of lettuce are butterhead, romaine, crisphead or iceberg, and loose leaf. Butterhead leaves have a buttery texture, they are similar to romaine, with less crispness and a shorter growth habit. Romaine, or Cos, grows long leaves with a firm central rib, it is more heat tolerant than other varieties. Crisphead, or iceberg, grows in a tight head similar to cabbage. They have a crunchy texture and are generally the mildest flavored lettuces. Loose leaf lettuce has tender, delicate leaves and doesn't grow a "head" but rather as a bunch of loose leaves. Summer crisp or Batavian lettuce has a mix of traits of iceberg and loose leaf, being crunchy in texture and having only a moderately dense head.
The less bitterness a variety of lettuce has, the higher the water content, and consequently the lower the nutritional value. All lettuce varieties will cross-pollinate easily, so be certain to allow only the cultivars you wish to harvest seed from to go to flower.
Lettuce is a fast grower, taking as little as 3 weeks to reach a harvestable size. Remember to keep your lettuce plants moist, and protected from heat. Slugs are the primary pest to watch for on lettuce, though cutworms can also ruin a planting by cutting the stems when seedlings first sprout. Defeat slugs by baiting, hand picking, or laying down a copper barrier. Protect from cutworms with a paper collar, or start lettuce indoors and move outside once they have a few true leaves on and have grown beyond cutworm edibility. Lettuce can be grown indoors over the winter under a grow light or in a windowsill.
Mix varieties of red, green, and mixed color lettuce in a salad for a more interesting presentation. Since lettuce varieties will cross so easily, try leaving two or three favorite varieties to cross-pollinate and see what exciting new crosses you can come up with. For butterhead, romaine, or loose leaf lettuces harvest only the leaves you need and allow the plant to continue growth; crisphead is best harvested as a whole head.
For planting: try planting lettuces under a fruit tree, in early spring they will receive full sun, and once the tree flowers and begins to put on leaves it will shade the lettuces leaves from the heat of the sun. SFG suggests 4 lettuce plants per square, and they can also be interplanted between taller growing brassicas to protect and shade them. If your tomatoes are ripening and you wish to have lettuces to go with them, try planting lettuce under the shade of the tomato plants, or in a shadier corner of the garden. If all else fails, grow them inside during the hottest part of the year, in the cool of the AC.
You are unlikely to be able to preserve lettuce at all; it manages fine in the fridge for a few days though. Be sure to stagger plantings every few weeks to ensure a crop all year and don't plant too many at once or you'll be swimming in fresh lettuce that HAS to be eaten, and can't be saved by preserving.
Happy lettuce growing!
Showing posts with label easy plants. Show all posts
Showing posts with label easy plants. Show all posts
Tuesday, February 28, 2012
Wednesday, February 1, 2012
Strawberries, the Ultimate Food Crop

 |
| One day's harvest, notice only some of the berries are fully ripe. |
One thing I have learned about growing strawberries is that you actually should pick the berries the day before they are perfect. I have found that if I leave a not-quite-ripe berry on the plant and come back the next morning it will be perfectly ripe... and have a HUGE hole through it where a slug beat me to the harvest. I don't know how, but the slugs have a nose for when a berry has reached its peak of perfection and I just can't seem to beat them. Instead I pick the berries just less than ripe, in the end this serves me well since a perfectly ripe berry will turn to sweet mush after being frozen. Also strawberry jam made with all-ripe berries is almost too sweet, less ripe berries tend to make a more flavorful and less sweet jam. I'm not saying that I pick them while they're still green; they are red, but a light red rather than the darker rich red of a fully ripe berry. Also, if berries have over-ripened, been chomped by something, or have mold on them; remove them and dispose of in compost. Berries shouldn't be left on the plant to go bad, they will grow mold and that will spread to the new berries still forming. Remove any damaged fruits as you do your harvesting and toss into a bucket for composting.
 |
| Strawberry patch viewed from the gate, they are slowly invading the empty lot next door. |
In conclusion:
-Strawberries will spread, keep runners in check to avoid being overrun.
-Keep bed clean to avoid the most common issues with strawberries: slugs and molds.
-Slug bait and harvest early if slugs are a problem
-Mulch beds with something that won't biodegrade to protect roots and fruits without being shelter for pests; black plastic, pebbles, lava rock.
-Take a Tylenol and keep on picking because by next May you will really be wishing you'd frozen more of these fabulous fruits.

 Labels:
easy plants,
freezing,
fruit,
garden,
harvest,
money-saving,
plants,
raised bed,
runners,
slugs,
snails,
strawberry,
vegetable
Labels:
easy plants,
freezing,
fruit,
garden,
harvest,
money-saving,
plants,
raised bed,
runners,
slugs,
snails,
strawberry,
vegetable
Wednesday, January 25, 2012
The Square Foot Method
 |
| Cover of All New Square Foot Gardening |
I've mentioned the Square Foot Garden or SFG Method several times so far. This method was developed by a man named Mel Bartholomew who realized that the standard row method of gardening was wasteful and produced poor results, so he developed a different (and in some ways better) method.
Mr. Bartholomew's Square Foot Method of gardening has some advantages, less water, less space needed, more produce grown. It is adaptable, easy to understand, and lends itself well to the backyard gardener. The method stems from the idea that plants need a particular spacing to do well and rather than fill widely spaced rows with carrots 3" apart, you build a small raised bed that you can reach all the way around, divide it into one foot squares and plant a different crop in each square, spaced according to recommendations. With this method a 4 foot by 4 foot bed will have a total of 16 square feet, each of which is planted with a different crop; one tomato, 4 lettuce, 16 carrots, 8 peas, 2 cucumbers, etc. Each square contains the appropriate number of that crop based on seed spacing guidelines. So a 12 inch by 12 inch square can support 16 carrots, evenly spaced in 4 rows of 4 seeds, each 3" apart.
Mel also realized that his garden beds only needed to be 6" deep, very few plants required more than that depth for root growth. Originally he used 1 foot deep beds, but discovered that the extra depth was wasted and eliminated it. He filled his beds with "Mel's Mix" a blend of compost, peat moss and vermiculite or perlite that he discovered was perfectly suited for growing vegetables, while staying soft and fluffy, rather than compacting or developing a crust like many soils.
With Mel's Mix he could fill a bed with the perfect soil for far less cost than repeatedly improving the soil in the ground.
Mel's books cover everything needed for a SFG garden, most of the information is very useful, some of it is just a reflection of Mel's own tendencies to be precise and linear. \
In general I think the book is worth reading, which is why I list it in my Recommended Reading links. Mel suggests laying out a permanent grid over the top of the bed to show the squares though, while he is right that this is a way to save time during planting, I dislike the straight lines of the grid showing amidst the wild tangle of plants. It's just too structured for my taste. Instead I go out each spring and lay tape over top of the beds to show my grid, do all my planting and then remove the tape. Also, Mel suggests mixing things up to confuse pests, and while I think the idea is sound, I find I still end up with a straight row of peas; I can't fit them all mixed in with other plants because they require trellising.
Not all of Mr. Bartholomew's advice is useful to everyone. The primary things I got from his books were: bed size --make beds small enough to be able to reach every square easily; soil --Mel's Mix is relatively inexpensive and gives more bang for your buck; plant spacing --a small space can easily grow far more than you'd expect.
Last summer was the first time I tried using the SFG method, and I have to say it worked remarkably well. I was very happy with the production of my garden. This year I plan to try pushing the limits of the SFG method by planting my larger plants by the square, then small root crops like green onion, carrots, radishes and garlic will be planted in rows between each square. I am hoping that a few small root veggies won't crowd the larger fruiting veggies too much and will save me a few squares of planting space that can be used for larger plants.
In conclusion, buy or borrow from the library Mel Bartholomew's book. Look it over, see what you can find in it that may prove useful. I can attest that his methods have proven themselves in my garden and would love to hear about other successes (or failures!), and what has been helpful to other gardeners.
Labels:
easy plants,
garden,
garden plan,
plants,
raised bed,
SFG,
small space,
square foot garden,
trellis,
vegetable
Tuesday, January 24, 2012
Pea Recipes
Obviously peas can be tossed into just about anything to brighten it up and add some vegetable goodness. I prefer to eat snow and snap peas fresh. I also toss fresh snow peas into stir fry at the last minute, just enough to warm them through. Peas can easily be blanched for 1-2 minutes, drained, and frozen in bags to store them for up to a year. But if you have a bumper crop and no idea what to do with them, here are some recipes specifically for peas.
From The Kitchen Garden Cookbook (a.k.a. Allotment Cookbook) edited by Caroline Bretherton:*
Pea Soup with Mint Gremolata
For the soup:
1 onion finely chopped
2 tbsp butter
1 potato coarsely chopped
1 lb. peas in their pods coarsely cut up
5 cups chicken or vegetable stock
1 tsp. superfine sugar
1 sprig fresh mint
Salt and pepper
Small amount half and half
For the gremolata:
2 tbsp finely chopped flat leaf parsley
2 tbsp finely chopped fresh mint
2 tsp finely grated lemon zest
1 garlic clove finely chopped
Gently cook onion in butter about 7-10 minutes, until soft. Add remaining ingredients for soup, except half and half. Bring to a boil, cover, reduce heat and simmer about 20 minutes. Until vegetables are very soft. Remove and discard mint sprig. Puree soup with stick blender or standard blender, strain through sieve to remove any strings or pod pieces, adjust seasoning to taste. Can be served hot or cold, or frozen for later eating.
Mix together gremolata ingredients. To serve, ladle soup into bowls, top with a swirl of half and half and a sprinkle of gremolata mixture.
*This is an excellent cookbook full of recipes for garden vegetables.
From Too Many Tomatoes, Squash, Beans, and other Good Things: A Cookbook For When Your Garden Explodes by Lois M. Landau and Laura G. Myers:*
Shrimp Risotto Salad
In large bowl combine:
1 cup peas, cooked
2 1/2 cups cold, cooked rice
1 cup diced celery
2 green onions, minced
2 tomatoes, quartered
1/2-1 lb. fresh, cooked shrimp
6 ozs. marinated artichoke hearts
Mix together and pour over salad:
Oil from artichoke hearts
2 Tbsps. white wine
1 tsp. anchovy paste
1 tsp. sharp prepared mustard
1/2 tsp. ground dried sage
Toss salad and dressing together and chill at least one hour.
Top with 2 quartered hard-boiled eggs and a little minced fresh parsley.
For some other ideas check out these websites:
Martha Stewart's pea recipes

Yes Peas! recipe pages

Eating Well Healthy Pea Recipes

My mom also has a recipe that she has made for many years with shelling peas, called Creamed Peas and Mushrooms, I will have to call her and get the recipe so that I can share it here.
From The Kitchen Garden Cookbook (a.k.a. Allotment Cookbook) edited by Caroline Bretherton:*
Pea Soup with Mint Gremolata
For the soup:
1 onion finely chopped
2 tbsp butter
1 potato coarsely chopped
1 lb. peas in their pods coarsely cut up
5 cups chicken or vegetable stock
1 tsp. superfine sugar
1 sprig fresh mint
Salt and pepper
Small amount half and half
For the gremolata:
2 tbsp finely chopped flat leaf parsley
2 tbsp finely chopped fresh mint
2 tsp finely grated lemon zest
1 garlic clove finely chopped
Gently cook onion in butter about 7-10 minutes, until soft. Add remaining ingredients for soup, except half and half. Bring to a boil, cover, reduce heat and simmer about 20 minutes. Until vegetables are very soft. Remove and discard mint sprig. Puree soup with stick blender or standard blender, strain through sieve to remove any strings or pod pieces, adjust seasoning to taste. Can be served hot or cold, or frozen for later eating.
Mix together gremolata ingredients. To serve, ladle soup into bowls, top with a swirl of half and half and a sprinkle of gremolata mixture.
*This is an excellent cookbook full of recipes for garden vegetables.
From Too Many Tomatoes, Squash, Beans, and other Good Things: A Cookbook For When Your Garden Explodes by Lois M. Landau and Laura G. Myers:*
Shrimp Risotto Salad
In large bowl combine:
1 cup peas, cooked
2 1/2 cups cold, cooked rice
1 cup diced celery
2 green onions, minced
2 tomatoes, quartered
1/2-1 lb. fresh, cooked shrimp
6 ozs. marinated artichoke hearts
Mix together and pour over salad:
Oil from artichoke hearts
2 Tbsps. white wine
1 tsp. anchovy paste
1 tsp. sharp prepared mustard
1/2 tsp. ground dried sage
Toss salad and dressing together and chill at least one hour.
Top with 2 quartered hard-boiled eggs and a little minced fresh parsley.
For some other ideas check out these websites:
Martha Stewart's pea recipes

Yes Peas! recipe pages

Eating Well Healthy Pea Recipes

My mom also has a recipe that she has made for many years with shelling peas, called Creamed Peas and Mushrooms, I will have to call her and get the recipe so that I can share it here.
Labels:
easy plants,
garden,
harvest,
money-saving,
organic,
peas,
plants,
recipe,
soup,
vegetable
Pea Culture
Hopefully I can get a few posts about the culture of different veggies up before spring comes along, to help out gardeners trying new things; on that note, this post is all about peas.
Peas originated in the Mediterranean and Middle East regions, they are eaten fresh or cooked. They can be frozen, canned (pressure can method), or dried. Peas are harvestable between 50 and 75 days depending on variety. There are three primary types of pea; the snow pea, snap pea, and shelling pea. Shelling peas are removed from the pod and only the pea seeds are eaten as the pods are tough and tasteless. Snow peas are the variety most often seen in stir fries, whole pods with smaller undeveloped seeds inside. Snap peas are eaten in the pod as well, but are even sweeter than snow peas and have a crisp, thick pod that is nearly stringless. Depending on which way you prefer to eat your peas you could plant one, two or all three types of pea in your garden.
Peas are one of the first things planted in the spring, they can germinate in soils that are only 40 degrees F. So long as the risk of hard frost has passed they can go directly into the garden. Peas should be sown in the ground, rather than started indoors. They are long and slim vining plants and don't always cope well with transplanting, they are also such fast growers, and have such large seeds that it's just much simpler to put them in the garden. If they fail to germinate in a week or so, plant another round and keep waiting. Pea seeds should be planted fairly deep, about an inch underground. They take up little room and require little nutrition, they can be planted as close as 1-2 inches apart. Or in SFG style, 8 plants to a square. Pea seeds will only be viable for about 2 years, so despite their inexpensive price don't be tempted to stock up too much. Peas are very easy to save seed from, simply leave the end-of-season crop on the vine until they brown and become dry, then harvest, dry further inside, then shell and store seeds in paper bags. (Avoid plastic bags as they can trap any remaining moisture and rot your seeds). Peas also self-pollinate, they don't require pollinators, and generally each flower will pollinate itself. This means that to accidentally cross two pea plants you pretty much have to rub them together. Pea seed will fairly reliably produce seed that grows the same plants as the previous generation.
A cool season crop, peas prefer temperatures below 70 degrees. Peas that mature in temperatures over 85 degrees can develop tough pods. Also, peas stop putting on flowers once temperatures get over about 85 degrees. Harvest continually to ensure continued production of fruits. You can increase your harvest by using a pea innoculant, but innoculant in no way guarantees a great harvest.
The greatest risk to peas is the enation virus, and you should watch for enation resistant varieties when selecting peas for your garden. Peas actually build nitrogen stores in the soil they are planted in, so are a great winter crop or rotation crop to keep in the organic garden. Move them around each year, or start an early spring crop in the space of later heavy feeders. By the time the peas are finishing their growth the heavy feeding summer plants should be ready to put outside.
As vining crops peas will need a trellis of some type, which also helps to keep the fruits up off the ground and in easy picking reach. Peas are an inexpensive, simple to germinate, delicious crop to grow and are perfect for gardens that have small children around. Kids can pick them easily, eat them straight from the vine, watch how they grow and twine around each other and the trellis. In general peas are a great crop for anyone.
I prefer to grow the snow or snap peas, shelling peas are so easy and inexpensive at the store it just doesn't make sense to use up garden space on them, snow and snap peas are expensive though. Plus, I don't look forward to all that shelling. Snow peas are delicious eaten fresh, they can also be blanched and frozen for eating throughout the year. Snap peas are also delicious fresh; sweet, crunchy, and very low in calories; snap peas do not store nearly as well though and can become mushy if frozen or canned. I suggest growing primarily shelling or snow peas, with a small bunch of snap peas just to eat fresh. Last year I planted 6 squares of peas, each square holding 8 plants and I was overwhelmed with the quantity of produce I harvested from them. It may not seem like it at first, but over time, as round after round of peas is ready to pick you will find that each plant is actually very productive. How many peas (in the pod) will you eat each day? However many you think that is, that's probably about how many plants you need. I will happily eat my way through 20-40 pea pods in a day, and my husband and kids rarely eat them. So I need 20-40 plants to produce that amount, if I plan to freeze them I will have to plant more. This year I am putting in more than last year because I only ended up with 2 quarts of frozen peas and would like to have more than that for next winter.

Next time: Pea Recipes, My Own and links to others.
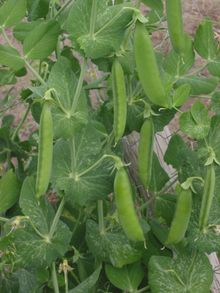 | |
| Pea plant in full fruit. |
Peas originated in the Mediterranean and Middle East regions, they are eaten fresh or cooked. They can be frozen, canned (pressure can method), or dried. Peas are harvestable between 50 and 75 days depending on variety. There are three primary types of pea; the snow pea, snap pea, and shelling pea. Shelling peas are removed from the pod and only the pea seeds are eaten as the pods are tough and tasteless. Snow peas are the variety most often seen in stir fries, whole pods with smaller undeveloped seeds inside. Snap peas are eaten in the pod as well, but are even sweeter than snow peas and have a crisp, thick pod that is nearly stringless. Depending on which way you prefer to eat your peas you could plant one, two or all three types of pea in your garden.
Peas are one of the first things planted in the spring, they can germinate in soils that are only 40 degrees F. So long as the risk of hard frost has passed they can go directly into the garden. Peas should be sown in the ground, rather than started indoors. They are long and slim vining plants and don't always cope well with transplanting, they are also such fast growers, and have such large seeds that it's just much simpler to put them in the garden. If they fail to germinate in a week or so, plant another round and keep waiting. Pea seeds should be planted fairly deep, about an inch underground. They take up little room and require little nutrition, they can be planted as close as 1-2 inches apart. Or in SFG style, 8 plants to a square. Pea seeds will only be viable for about 2 years, so despite their inexpensive price don't be tempted to stock up too much. Peas are very easy to save seed from, simply leave the end-of-season crop on the vine until they brown and become dry, then harvest, dry further inside, then shell and store seeds in paper bags. (Avoid plastic bags as they can trap any remaining moisture and rot your seeds). Peas also self-pollinate, they don't require pollinators, and generally each flower will pollinate itself. This means that to accidentally cross two pea plants you pretty much have to rub them together. Pea seed will fairly reliably produce seed that grows the same plants as the previous generation.
A cool season crop, peas prefer temperatures below 70 degrees. Peas that mature in temperatures over 85 degrees can develop tough pods. Also, peas stop putting on flowers once temperatures get over about 85 degrees. Harvest continually to ensure continued production of fruits. You can increase your harvest by using a pea innoculant, but innoculant in no way guarantees a great harvest.
The greatest risk to peas is the enation virus, and you should watch for enation resistant varieties when selecting peas for your garden. Peas actually build nitrogen stores in the soil they are planted in, so are a great winter crop or rotation crop to keep in the organic garden. Move them around each year, or start an early spring crop in the space of later heavy feeders. By the time the peas are finishing their growth the heavy feeding summer plants should be ready to put outside.
As vining crops peas will need a trellis of some type, which also helps to keep the fruits up off the ground and in easy picking reach. Peas are an inexpensive, simple to germinate, delicious crop to grow and are perfect for gardens that have small children around. Kids can pick them easily, eat them straight from the vine, watch how they grow and twine around each other and the trellis. In general peas are a great crop for anyone.
 |
| Snow peas, purple beans, and zucchini: one day's harvest. |

Next time: Pea Recipes, My Own and links to others.
Labels:
cross-pollinate,
drying,
easy plants,
flower,
freezing,
fruit,
garden,
harvest,
money-saving,
open pollinated,
organic,
peas,
plants,
recipe,
seed,
small space,
trellis,
vegetable
Monday, January 23, 2012
Kale, Kale, Rock N Roll!
One of the few things that you can still be harvesting in January is kale. Kale is a relative of broccoli and cabbage, a brassica. In moderate climates you can grow kale nearly year round. It has few, if any, issues with pests and disease. Kale is incredibly high in nutritional value as well, being a dark leafy green. So why isn't kale grown in every garden all year? Many people don't know much about it, or have no idea what to make with all of that kale. Like the rutabaga, kale has gotten a bit of a bad rep.
Since kale really does grow so easily I really don't need to go into much detail on kale culture, just give it dirt, water and sunshine. It should start easily from seed and can be grown almost any time of year; obviously not during a heavy freeze, or major drought. Since kale doesn't need much detail regarding care, the more important question to answer is "what do I do with all that kale?".
One option is lizard food. Anyone who has a vegetarian reptile, such as an iguana, knows they require dark leafy greens in their diets to stay healthy. So feel free to donate your bumper kale crop to a friend with an iguana.
Kale is not like lettuce, it has a much tougher texture and is not as good fresh eating. Instead it should be cooked and added to foods. It can be added to soups, casseroles, colcannon (a great vegetable and mashed potato dish), or wilted and served as a side dish. It will wilt quickly and should be kept in the coldest part of your refrigerator. When grow in colder weather it is sweeter, if grown during the summer heat it will become bitter. The one thing to watch out for is to wash it really well, the deep ruffles in kale leaves often collect dust and grit. Wash well and enjoy.
Here are some of my favorite uses for kale:
Olive Garden's Zuppa Toscana Soup

Colcannon

Bobby Flay's Sauteed Kale
Spaghetti With Kale and Sun-Dried Tomatoes

Vegetable Barley Soup

Kale is a great way to add some nutrition and color to just about any cooked dish. Good luck with your kale cuisine!
Since kale really does grow so easily I really don't need to go into much detail on kale culture, just give it dirt, water and sunshine. It should start easily from seed and can be grown almost any time of year; obviously not during a heavy freeze, or major drought. Since kale doesn't need much detail regarding care, the more important question to answer is "what do I do with all that kale?".
One option is lizard food. Anyone who has a vegetarian reptile, such as an iguana, knows they require dark leafy greens in their diets to stay healthy. So feel free to donate your bumper kale crop to a friend with an iguana.
Kale is not like lettuce, it has a much tougher texture and is not as good fresh eating. Instead it should be cooked and added to foods. It can be added to soups, casseroles, colcannon (a great vegetable and mashed potato dish), or wilted and served as a side dish. It will wilt quickly and should be kept in the coldest part of your refrigerator. When grow in colder weather it is sweeter, if grown during the summer heat it will become bitter. The one thing to watch out for is to wash it really well, the deep ruffles in kale leaves often collect dust and grit. Wash well and enjoy.
Here are some of my favorite uses for kale:
Olive Garden's Zuppa Toscana Soup
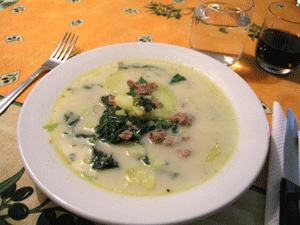
Colcannon
Bobby Flay's Sauteed Kale
Spaghetti With Kale and Sun-Dried Tomatoes
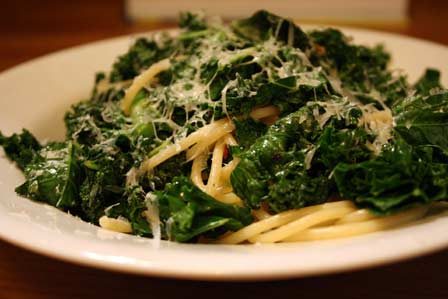
Vegetable Barley Soup

Kale is a great way to add some nutrition and color to just about any cooked dish. Good luck with your kale cuisine!
Labels:
colcannon,
easy plants,
garden,
harvest,
kale,
money-saving,
organic,
plants,
recipe,
soup,
vegetable,
zuppa toscana
Easy Plants Are a Myth
People often say that a certain plant is easy to grow, or difficult to grow. I say it's BS. Supposedly a great easy to grow plant that even a kid can plant is sunflowers. Well, I have planted mammoth sunflowers many many years and they've always either failed to sprout at all, or grown the saddest spindliest flowers I've ever seen. Last summer however my 3 year old son was helping in the garden and I gave him a couple sunflower seeds to bury just so he could plant some seeds that were large and easy to manage. His two sunflowers topped 12 feet in height, they also put out flower heads that were a good 12 inches in diameter. Maybe it was just better soil? Nope, I put in a few sunflowers too. Planted them at the same time and they only grew to about 6 feet and had 6-8 inch flowers. I have no idea why, but the sunflowers loved being planted by the small boy.
Among the so-called "easy to grow" plants most people list perennial herbs, tomatoes, pumpkins, summer squash, annual flowers, and hardy greens like kale and chard. If you are just starting out with gardening give these plants a shot, but don't give up hope if they don't do well. Sometimes it will just turn out that you have a knack for celery (known to be a very finicky plant), while tomatoes fiercely dislike you.
My brother built a massive greenhouse and garden last summer, on my parents' property. The garden there has been producing piles of tomatoes and summer squash for nearly 20 years. He saved the hot crops for the greenhouse, but continued the tradition of putting summer squash in the garden, he also planted peas, turnips, carrots, kale, broccoli, and chard. While this was the first year he managed such a large garden he is an experienced gardener. Guess what? Everything in the garden did great... except the squash, and the peas. For some crazy reason last year the only things that would grow well in that garden were root veggies and brassicas.
Some crops are considered easy because they have few known diseases or predators, or because they can withstand some drought or flooding. Very few veggies should be considered easy to grow, nearly all of the vegetables people plant are so carefully bred that they are entirely dependent on human kindness for survival. Kale is one of the few that could probably manage on it's own, and in hot climates it is challenging to grow outside of the winter months.
Often when you have difficulty with a certain plant it is not because the plant is difficult but because you don't yet have an understanding of what it takes to make that plant happy. Since a pumpkin makes a very small root compared to the massive amount of aboveground space it takes up, it doesn't generally need a lot of well worked soil. The pumpkins roots won't spread much, they can be put in a 6" pot in a hole full of rocks and be content so long as their 6" of dirt is highly nutritious. Meanwhile, carrots sprout from very tiny seed that then sends down a tap root, while carrots don't actually bulb like an onion (so they can be spaced fairly close) they are rather delicate and need their soil loosened and fluffed to make growth straight down easier. If you've got heavy soil and only loosen the top inch or so, your carrots will never do well. I have never yet been able to grow carrots well. This year I plan to try again in the "Mel's Mix" soil, in hopes that it is light and fluffy enough to keep carrots happy.
Once you get a handle on what the plant needs to be happy you will find it easier to provide those things and have a very "easy" plant to grow. For me, one of the "easy" plants I struggled with was pumpkins. I put them in the ground and they got powdery mildew, or didn't sprout, or didn't grow beyond a sprout, or grew long and happy and healthy but didn't produce any pumpkins. Each year I learned a few things so that I got a little closer to pumpkin perfection. Initially I had it in my head that pumpkins were colder weather plants, it seemed reasonable since they aren't harvested until fall, I planted them in March and my seeds didn't sprout. The variety I was growing needed about 100 days to reach harvest, so I figured out that I needed to start them indoors to keep them warm until the weather improved, this also helped prevent the mildew that sets in during the wet months in spring. Once I had a good start going and the weather improved I moved it into the garden bed, but that year I let them sprawl and only had room for one plant: it grew well but no pumpkins developed. Finally I began trellising, it gave me enough room to grow three pumpkins in my small space and finally had the cross-pollination needed to produce some very healthy fruits.
Gardening is a learning experience, each year you find that you get a little better at managing the plants you grow and get a little better fruit or flower in return. It's a struggle at first for most people, but it does get better. You may never be able to get the hang of sunflowers, but you may grow the best turnips in the county instead. There is no such thing as an "easy" or "difficult" plant, it all depends on the gardener, the garden, the weather, and how many butterflies flap their wings in Taiwan. Gardening is truly an experiment in chaos theory unlike any other.
Among the so-called "easy to grow" plants most people list perennial herbs, tomatoes, pumpkins, summer squash, annual flowers, and hardy greens like kale and chard. If you are just starting out with gardening give these plants a shot, but don't give up hope if they don't do well. Sometimes it will just turn out that you have a knack for celery (known to be a very finicky plant), while tomatoes fiercely dislike you.
My brother built a massive greenhouse and garden last summer, on my parents' property. The garden there has been producing piles of tomatoes and summer squash for nearly 20 years. He saved the hot crops for the greenhouse, but continued the tradition of putting summer squash in the garden, he also planted peas, turnips, carrots, kale, broccoli, and chard. While this was the first year he managed such a large garden he is an experienced gardener. Guess what? Everything in the garden did great... except the squash, and the peas. For some crazy reason last year the only things that would grow well in that garden were root veggies and brassicas.
Some crops are considered easy because they have few known diseases or predators, or because they can withstand some drought or flooding. Very few veggies should be considered easy to grow, nearly all of the vegetables people plant are so carefully bred that they are entirely dependent on human kindness for survival. Kale is one of the few that could probably manage on it's own, and in hot climates it is challenging to grow outside of the winter months.
Often when you have difficulty with a certain plant it is not because the plant is difficult but because you don't yet have an understanding of what it takes to make that plant happy. Since a pumpkin makes a very small root compared to the massive amount of aboveground space it takes up, it doesn't generally need a lot of well worked soil. The pumpkins roots won't spread much, they can be put in a 6" pot in a hole full of rocks and be content so long as their 6" of dirt is highly nutritious. Meanwhile, carrots sprout from very tiny seed that then sends down a tap root, while carrots don't actually bulb like an onion (so they can be spaced fairly close) they are rather delicate and need their soil loosened and fluffed to make growth straight down easier. If you've got heavy soil and only loosen the top inch or so, your carrots will never do well. I have never yet been able to grow carrots well. This year I plan to try again in the "Mel's Mix" soil, in hopes that it is light and fluffy enough to keep carrots happy.
Once you get a handle on what the plant needs to be happy you will find it easier to provide those things and have a very "easy" plant to grow. For me, one of the "easy" plants I struggled with was pumpkins. I put them in the ground and they got powdery mildew, or didn't sprout, or didn't grow beyond a sprout, or grew long and happy and healthy but didn't produce any pumpkins. Each year I learned a few things so that I got a little closer to pumpkin perfection. Initially I had it in my head that pumpkins were colder weather plants, it seemed reasonable since they aren't harvested until fall, I planted them in March and my seeds didn't sprout. The variety I was growing needed about 100 days to reach harvest, so I figured out that I needed to start them indoors to keep them warm until the weather improved, this also helped prevent the mildew that sets in during the wet months in spring. Once I had a good start going and the weather improved I moved it into the garden bed, but that year I let them sprawl and only had room for one plant: it grew well but no pumpkins developed. Finally I began trellising, it gave me enough room to grow three pumpkins in my small space and finally had the cross-pollination needed to produce some very healthy fruits.
Gardening is a learning experience, each year you find that you get a little better at managing the plants you grow and get a little better fruit or flower in return. It's a struggle at first for most people, but it does get better. You may never be able to get the hang of sunflowers, but you may grow the best turnips in the county instead. There is no such thing as an "easy" or "difficult" plant, it all depends on the gardener, the garden, the weather, and how many butterflies flap their wings in Taiwan. Gardening is truly an experiment in chaos theory unlike any other.
Labels:
cross-pollinate,
easy plants,
flower,
fruit,
garden,
harvest,
organic,
plants,
pumpkin,
seed,
small space,
starts,
vegetable
Subscribe to:
Posts (Atom)