Showing posts with label fruit. Show all posts

Tuesday, August 7, 2012

Cucumber Culture

Cucumbers are one of the best summertime garden treats.  They are so low calorie that I've heard they contain fewer calories than you burn digesting them, making them a great diet snack. 


In the garden cucumber plants are most likely to suffer from powdery mildew, this can be prevented by watering them only at the soil level, early in the day, and avoiding touching the leaves when wet.  Another major contributor to powdery mildew is planting too early, give the soil plenty of time to warm up and your plants will be in much better health.  Cucumber beetles can be a major pest problem, and spread bacterial wilt as well.  Pick off beetles and destroy them daily.  Watch for signs of bacterial wilt: unexplained wilting and sticky stringy sap inside stems.  If you discover a plant infected with bacterial wilt remove it immediately to prevent spreading the disease.  Avoid planting other cucurbits in the infected area for at least one year, preferably three to four years.  You can also place black plastic over the infected soil between planting seasons to heat the soil and kill off the disease and it's carriers, cucumber beetle grubs. 

Female flower with tiny cucumber ovary at base.
Cucumbers grow sturdy, spiny vines and depending on the type will put out either male, female, hermaphroditic, or male AND female flowers.  Gynoecious cucumbers have all female flowers that will not pollinate if there is no male flowered plant near them.  Often gynoecious seed packets include one or two male seeds that are tinted gray or black, to insure you will have a male plant in your garden.  Hermaphroditic cucumbers have both male and female parts on each flower and are capable of pollinating each other and their own flowers.  Monoecious cucumbers have separate male and female flowers on the same plant.  Similar to most squashes, these plants put on several male flowers before they begin to produce female flowers.  Parthenocarpic cucumbers have the ability to set fruit without pollination.  Parthenocarpic varieties are excellent for greenhouse or indoor growing where pollinators may be non-existent.

Male flower with no ovary at the base.
Of the varieties I planted this year, Marketmore 97 and Bush Pickle are both monoecious, while Lemon cucumber is hermaphroditic.  I'm not sure what the National Pickling is, but it appears to have both male and female flowers so I am going with monoecious.

Traditionally cucumbers trail across the ground, but by trellising them or wrapping them around a tomato cage you can reduce the risk of soil-borne disease reaching the leaves.  You can also look for bush varieties that take up less space if you are container gardening or don't have room for the large vining varieties.

Besides the different varieties of reproduction in cucumbers you also have choices based on what you plan to do with your cucumbers.  Slicing cucumbers are larger and tend to be better eaten raw.  Pickling cucumbers are grown for canning as pickles.  They are smaller, often with a tougher skin that protects the fruit during the canning process and becomes softer after brining and canning.  Canning a large slicing cucumber would just give you a mushy pickle.  Often pickling cucumbers produce larger amounts in a shorter time frame too, to accommodate picklers. 

There are also several unusual varieties to try out, such as the Lemon cucumber which develops as a yellowish fruit about the size and shape of a small orange.  Or the Mexican Sour Gherkin, a bite-sized cucumber with a hint of citrus flavor to them.

In conclusion, cucumbers are worth the space in a small garden, or in a pot on the patio; delicious, healthy, outstanding producers, and a cool treat in the summertime.  Give them a shot and don't be surprised if you find yourself wondering what to do with all of them! 

*Next up: What To Do With All These Cucumbers*

Tuesday, July 3, 2012

Slacker Blogger = Harvest Tuesday

This post was meant to be for Harvest Monday... but I got distracted by Legos and never wrote it.

Raspberry Jam!
 I started out my week's harvest by heading back to the farm to pick raspberries.  Then I made up 14 jars of raspberry jam and 2 jars of raspberry sauce (for mixing into yogurt and stuff).  I'm hoping that the raspberry and strawberry jams together will keep us in jam until next year; I am really tired of picking berries now.

Peas and strawberries.
 The sugar snap peas are finally piled with fat pods, and the snow peas are just starting to have harvestable pods ready too.  Yesterday I picked 1 1/2 quarts of them for my mom.  Friday I picked another quart of sugar snaps for my trip south to visit friends, and Wednesday I picked half a quart.  Peas are one of my favorite things to grow in the garden, especially since the snow and sugar snaps are so expensive to buy at the store.  Shelling peas just don't seem worth it though, they are cheap and it would take up a lot of space to grow enough of them.  Somehow I ended up with one shelling pea plant in my sugar snaps though, so now amid my 63 sugar snap plants there is one shelling pea plant hiding.  I'd just pull it out but they are a tangled mass now, so instead I have to watch out for the pods and separate them from the others.  It's no fun eating sugar snaps and then accidentally biting into the tough, tasteless pod of a shelling pea.
 The strawberries above are from the yard, picked yesterday.  They went into a gallon bag and into the freezer, I'll continue to add to this bag until it's full then start a new one if they are still producing.  Not sure I'll get two bags though, the strawberries are definitely starting to wind down.

More peas, and a cabbage
 The Parel cabbages are just finishing up, I've picked 3 already.  They are about a pound each and very space-saving.  I find them to be excellent since we rarely manage to use up a whole large cabbage before it goes bad.  These are a one dish cabbage.  The combination of slugs, earwigs, and cabbage loopers meant i lost more than a few leaves to insect damage, but the centers of the heads were untouched and perfectly lovely.  I'm not sure how much longer the Derby Day cabbages will go, the heads are about the size of baseballs and very firm but they are supposed to get much larger than the Parel.

Pearl onions, Alex's carrots, cabbage, and lettuces.
 The bonus to Oregon being among the three states in the Union that are not swelteringly hot right now, is that I still have lettuce!  In fact, I haven't lost a single lettuce plant to bolting this year.  The only thing that has bolted in my garden is the cilantro, but that's to be expected.  Of course, the downside to that is that the eggplants and peppers (my biggest heat-loving plants) are incredibly sad, and I'm beginning to lose hope that they will recover from this.  If I had known what the weather was going to be like this summer I would've grown spinach, and much more leaf and stem crops and less heading and fruiting crops.  Oh well, you know what they say about hindsight.

Monday, June 25, 2012

Harvest Monday: June 25th

Harvest Monday is sponsored by Daphne's Dandelions and is an opportunity to share your harvests and what you do with those harvests with others.  Please stop by to see what other gardeners are doing this week.

This week I went strawberry picking at a local farm.  After picking and hulling 9 1/2 pounds of berries, I made 18 jars of freezer jam.  I don't think that 18 plus the 5 remaining from last year is going to last us a full year though.  The farm will have raspberries ready this week, so I will be out picking them and hopefully make up another 10 or so jams, so we'll have enough to last until next summer.

One of the week's harvests: broccoli, pearl onions, sugar snap peas, and carrots.
 Besides the farm picking, I brought in another 3 lbs. of strawberries off my own plants (yay! more strawberry shortcake! I am going to get SO fat.)  As well as several more harvests.  Mostly the harvests were of pearl onions, a few carrots, and some sugar snap peas.  I did get a couple good sized broccoli and one small cabbage, because I was impatient and couldn't wait any longer to pick one.  The peas, onions, carrots, and broccoli went into a stir fry.  My mom got a bunch of everything except the broccoli too.

Yum! Stir fry.
 The cabbage and remaining onions and carrots will be made into coleslaw for my husband; and any peas that come in will either be eaten as snacks or frozen for another time.

My daughter stretching out to enjoy the evening on the patio.
It's amazing how much arm-twisting goes into getting a 13 year old computer geek outside during the summer, so I was amazed and pleased to see my girly outside after our jam-making, enjoying a little relaxation in the night air.  This picture also makes it obvious that the patio could use some tidying up, so I think that will be my chore for the day.

Wednesday, June 13, 2012

Strawberry Shortcake!

This morning, after ignoring them for 3 days, I went out and picked strawberries.  Despite all of the slug nibbling, I managed to harvest 2 lbs. 4.5 oz. today.

Strawberries!! (and a scale, for scale)
Of course, the very best thing to do with my first decent strawberry harvest of the year... is to make Strawberry Shortcake!  My absolute favorite dessert.

There are three categories of strawberry shortcakes: Lazy, Simple, and Old Fashioned.

The Lazy shortcake maker mashes berries, buys a pack of little spongecake cups, or an angel food cake, or something similar, and tops it with spray whipped cream or CoolWhip.  This is tasty enough, super easy to make even if you live in a teepee, and you could do it while completely drunk.  It's more expensive though and is the least tasty option.

The Simple shortcake maker mashes berries with a tablespoon or two of sugar; takes out a box of Bisquik and makes up the biscuit recipe with a few tablespoons of sugar added; then tops it off with spray whipped cream or homemade whipped cream if they have none in a spray can.  This is the way I generally make mine, because I'm lazy and it's Simple.  It tastes better, is much cheaper if you keep biscuit mix around the house normally, and while you need an oven for it (can't make it in a teepee) it is still pretty foolproof.

The Old Fashioned shortcake maker mashes berries with a bit of sugar; gets out a proper shortcake recipe and bakes it up; then tops it with fluffy delicious homemade whipped cream that they've whipped with the sweat of their brow.  This is the BEST way to have shortcake.  I don't generally feel like putting this kind of effort into it... but when someone else does, I will eat it with much praise and delight.

I can't even truly explain the difference, but you know it when you try it.  I also can really appreciate knowing exactly what went into a treat like this.  Yes, buttery shortcake and heavy cream aren't exactly "healthy" foods; but it's nice to know there's no carageenan, guar gum, hydrogenated vegetable oil, or Red #5 in it.  Just organic strawberries, heavy cream, sugar, flour, eggs, salt, milk, butter, and baking powder.

So for those who want to give the experience of real shortcake (rather than little spongecake cups) a try at home here is my Old Fashioned Shortcake recipe:

2 1/4 cups flour
4 tsp. baking powder
2 tbsp. sugar
1/2 tsp salt
1/3 cup butter (softened) or shortening (butter will give a crunchier crust, shortening a softer crust)

Mix together all of the dry ingredients.  Cut the butter/shortening in with forks or pastry cutter until it gets a crumbly texture.  Set aside.

1 egg
2/3 cup milk

Mix together the wet ingredients.  Pour into the crumbly mixture, and combine together carefully (it is a quick bread, similar to muffins and over-mixing will make it tough!) until ingredients are well-incorporated.  Press dough evenly into a well greased 8x11 or 9x9 baking dish.  Bake for 15 minutes at 425 degrees, a toothpick inserted should come out clean.  Cut into pieces and serve with sweetened mashed strawberries (or other fruits or berries!) and whipped cream. 

Tip #1: don't accidentally read the recipe next to it in your cookbook and add way too much sugar. Like I just did. /facepalm

Tip #2: don't use a whisk to cut in the butter, like I just did, it will just get all of the butter stuck in the whisk and be a pain to get out.

Tip #3: don't forget to grease your pan, like I just did.

Wow, I'm just on a roll today.  If this shortcake comes out decent it will be through sheer luck!

...15 minutes later...


Amazingly, it turned out beautiful!
And that is how you make an old fashioned traditional shortcake.  Enjoy!

Monday, June 4, 2012

Harvest Monday: June 4th

Despite the muggy, overcast days and rain over night I have been harvesting quite a bit this week.  I really need to stay on top of taking pictures of my harvests though.  Over the weekend I harvested a few heads of lettuce for the house, and several more for my mom.  I also sent my mom a pile of kale, pearl onions, celery, and some fresh herbs.  All in all, she got a full reusable grocery bag full of veggies weighing in at just under 3 lbs.

This morning I got my very first harvest of strawberries too!  Three whole berries, one of which the slugs had already ravaged...but two out of three ain't bad.  I believe these are Benton strawberries, and they are delicious and require very little on my part, except picking.

First strawberries
In other news, I hit the jackpot at the produce market the other day.  Bought a 20 lb. bag of organic carrots for $11, and two pounds of white mushrooms for $0.99/lb.  I would have gotten more mushrooms but I bought up all they had.  I spent all day Saturday peeling, slicing, blanching, and freezing the carrots.  Now I have 21 half quarts of carrots in the freezer, all ready to be used in meals.  Best $11 I've spent in a while.  Those carrots will likely last us all year; and the ones in the garden will be for fresh eating.  I also washed, sliced, and sauteed the mushrooms to get 8 cups of sauteed mushrooms to put in the freezer.  I'm very happy about the mushrooms and will be on the lookout for more deals like that, no one in the house eats them but me and I find that they often go bad in the bottom of the fridge when I buy them fresh. 

Now if only the sun would come back, I could be outside working in the garden again.  The blackberries aren't going to chop themselves.

Harvest Monday is sponsored by Daphne's Dandelions.

Tuesday, April 17, 2012

Let's Talk Tomatoes!

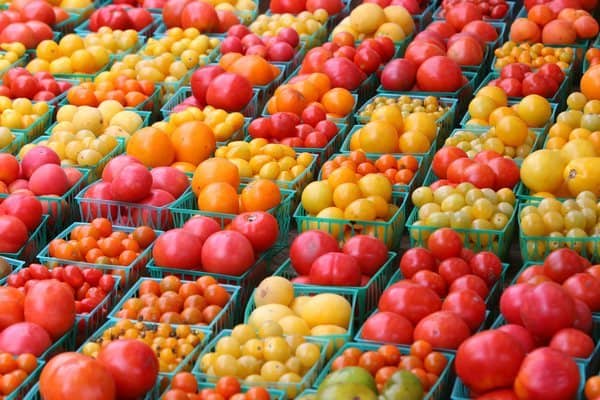
Tomatoes are probably the most popular garden plants, they are the first vegetables most gardeners grow and as they become more experienced they are likely to plant more rather than fewer tomatoes.  There are so many varieties of tomatoes available, in different shapes, sizes, and colors that selecting for a small space or limited budget can be a real challenge.


Tomatoes can be sorted into cherry/slicer/sauce or determinate/indeterminate or ultra early/extra early/early/midseason/late or tomato leafed/potato leafed... like I said, it can be challenging to pick just a few.

From my own experience, and based on your personal needs, I suggest planting at least three tomatoes each year.  If your family likes cherry tomatoes plant a few of them; if they like slicers and cherries, mix it up accordingly; if you plan to do some canning, freezing, or drying do saucing tomatoes as well.

The primary difference between these types is size and dryness.  Cherry tomatoes (or grape, currant, etc.) are generally one to two-bite sized.  Depending on the variety they can be super sweet flavored to tart.  They can be highly wet and juicy like a mandarin orange or thicker skinned and drier (more like a tiny roma).  Generally cherry tomatoes run in the sweet and juicy category, more than the dry and tart.  They come in every possible color; white, yellow, orange, red, pink, purple, brown, green, even striped. 

Slicing tomatoes are what people think of for thick slices of ripe tomato on their burgers.  They are usually much larger than cherries.  Slicers tend toward rich tomato flavor, lots of juice and large seed pockets.  They are delicious for fresh eating but don't make the best sauce since their flavor is not as strong as a saucing tomato and they have less actual flesh; all slicers would make a very watery, seedy sauce.

Saucing tomatoes are meaty, they contain fewer seeds in smaller seed pockets than slicers.  They have much more actual "flesh" to them.  Saucers also tend to be more tart than slicers or most cherries, this tartness is due to a higher acid content (which is necessary for safe canning).  They also make excellent sun-dried tomatoes because of their lower moisture content.

Personally, I never seem to plant enough saucing tomatoes to make full batches of sauce so often add a few slicers or excess cherries to fill it out.  This year I'm hoping to solve that problem.

Determinate tomatoes tend to be shorter in season, they keep a compact size and are preferred for container gardening.  Determinates will grow to a certain size, put on almost their entire crop at once and then stop producing.  These are a great option for canning if you have enough of them because all of the tomatoes are ready at once.  They also are handy because of their shorter season, and are likely to be the first tomatoes of the summer.

Indeterminate tomatoes will grow throughout the summer, and produce fruits one after another, after another up until the weather cools.  They can get up to 10' or even 12' tall, and can produce 15 lbs of fruit or more before cold weather sets in.  Indeterminates tend to outproduce determinates, but the fruits come on a few at a time over the summer.

Remember the difference: Determinates are determined to fruit at once; indeterminates will grow to an indeterminate height.

Choosing based on season can be very confusing.  Here in the Willamette Valley we can easily get 100-120 days of pure sunshine over the summer.  It rains 9 months of the year here, but for the 3 months of summer and even into the Fall a bit we have completely dry sunny days.  Effectively this means by starting seeds inside we can plant even the latest season tomatoes here.  People living in areas with higher altitudes, or higher latitudes may find they can only get fruit from the ultra early, extra early, early, and maybe midseason varieties.  Also those in warmer climates than mine may find that planting in summer gives them bushy plants but little fruit; this is because tomatoes will often stop producing flowers when temperatures are above 80 degrees.  If this causes you trouble try starting plants inside and then moving them into the garden earlier in the year when nighttime temperatures no longer drop below 40.

If you plan to plant a lot of tomatoes try mixing it up and including both early and late season plants.  This should keep you in tomatoes from mid-June until October.  If you are more limited in space give midseason varieties a try, they can be a good way to test whether you should swap to an earlier producer, or if a later one would work in your garden.  In my opinion, the very best tomatoes I grow are late season and I recommend trying to get at least one of them into your garden.

Some other things to consider with tomatoes:
- potato leafed varieties can be great but tend to be more susceptible to late blight and fungal diseases,
- watch for resistant varieties where possible,
- some of the best flavored tomatoes are heirlooms and I highly recommend them,
- crack resistance can be important in containers (where plants are more likely to dry out between watering) and in late season plants (chilling and warming in early fall can cause cracking),
- if the varieties you select don't seem to do well in your garden there are plenty more to choose from!


Here's a quick list of some varieties I've had experience with in my own garden.

Stupice: ultra-early.  I wasn't impressed by these, the tomatoes were fairly small and my harvest was not particularly good but they had a great slicing tomato flavor.  I have heard other people rave about them, but I prefer my slicers to be larger.

Oregon Spring:  extra early, determinate, slicer.  Loved these!  Stumpy 2'-3' plants put on nearly 10 full sized slicer fruit that were delicious, also the earliest of the varieties I planted last year.  Plants were healthy and compact and would likely do very well in containers.

Beaverlodge Plum:  ultra early, determinate, sauce/slice.  These produced great fruit, that were a bit on the juicy side for saucing but very tasty.  Fruit came about the same time as the Oregon Spring ones.  Got a bit tall and probably wouldn't do as well in containers as more compact varieties would.

Oregon Cherry:  cherry, determinate.  These did not produce particularly well even when all the other tomatoes did.  Also, the fruit are not the juicy sweet globes you expect from a cherry tomato, they are more like a tiny roma.  Tart, and more dry.  I was disappointed in this variety.

Sweet Million:  early, indeterminate, cherry.  My favorite so far of the cherry varieties (I've only tried a few though).  Little red spheres are one to two-bite sized, and pop open on the tongue nicely with thin skins, tons of juicy goodness, and a sweet flavor.  The epitome of a cherry tomato.

Chocolate Cherry:  indeterminate, cherry.  Everyone loved these! These little globes are a purplish brown in color, and plants produce well.  Sweet, juicy, thin skinned.  My mom compared their flavor to that of a plum. Yum!

Cuore di Bue (oxheart):  indeterminate, mid- to late season, sauce/slicer.  This is one of my favorites.  Plants have been consistently healthy (planted them for 3 years now).  Fruits are very large, meaty, and flavorful.  They have a great rich flavor to them.  Dry enough for saucing, but moist enough to use as a slicer as well.  I absolutely recommend giving them a try.

Black Plum:  heirloom, indeterminate, mid-season.  I was very impressed with the health and productivity of this variety.  The fruit were plentiful and tasty, with more sweetness to them than the Beaverlodge Plums.  They are a little too juicy for good saucing, but are excellent slicers.  The downside is that most of the fruit were fairly small; which makes using them for sauces a pain as well.

Brandywine (Pink):  heirloom, indeterminate, late season.  Everyone raves about Brandywine, and for good reason.  This potato leaf variety is not a big producer, but what it does produce is often huge! Last year I picked a Brandywine that was as large as a small pumpkin, and weighed in at about 3.5 lbs.  Fruits are large, juicy, sweet, meaty, and rich.  They have the best old fashioned tomato flavor.  However, as late producers a cool summer means fruits may never ripen (they are great as fried green tomatoes too), they are not prolific producers, they are fairly susceptible to fungal diseases, and may not fruit at all if planted to late or too early.  Yes they are finicky, and yes they are worth it.

Silvery Fir Tree: determinate, extra early, slicer.  I tried these last year, the plants were pretty and fairly healthy, and they produced well.  Tomato flavor was average, not great, not bad either.

Legend:  unknown, slicer.  My sister and brother grew these and said they did well and were tasty, but mine grew a healthy plant that only produced about 3 tomatoes.  Though the flavor was good, and the size was decent, I wasn't impressed enough to grow them again.

This year I will be trying a few new varieties as well as my old favorites.  Pineapple caught my eye and I'm hoping it turns out to be as great as it looks; with great big yellow fruit with pink striping inside.  San Marzano Gigante 3 is a large saucer; I'm still looking for the perfect saucing tomato and this year I'll give San Marzano a shot, the larger fruit will hopefully make all the skinning and chopping go faster.  Zebra Cherry is a new cherry tomato I'm trying this year with gorgeous striping; if it's productive and has a good flavor I may recommend it next year.  Indigo Rose: this one just struck me as super cool and I'm willing to give it a chance; a main season slicer that is indigo in color.  I'm curious about the flavor of this one and would be very excited if it turned out to have a sweet, almost blueberry-like flavor (not likely, but I can dream).


What are some of your favorite varieties of tomato to grow and why?  What are your least favorite?  (I'm always on the lookout for help narrowing my options.


Thursday, March 15, 2012

Mother Nature's Got Me Singin' the Blues

I'm singin the pouring down rain blues.  It was supposed to be sunny next Monday and Tuesday, but after checking the forecast this morning I'm not going to hold my breath waiting for the sun.  My garden beds are so wet there are puddles on top of them, luckily they drain well and one good warm day will leave them workable. 

Meanwhile, I ordered some beneficial nematodes that should arrive soon.  I figured the nematodes couldn't hurt, and I have some concerns regarding the spotted cucumber beetles I saw last summer.  If they laid eggs in my soil I'd better have some defenses in place; I don't really have enough room for good crop rotation so have to use other options to control problems.

I also took some advice on my seedlings and spritzed them with 1/2 strength fish emulsion to give them a boost, one week later it seems to be paying off since they are working on putting out new leaves and aren't showing signs of nutrient shortage.  I ran a quick soil test too, to see where things are in this third year of gardening in the same soil.  I usually add some compost during the growing season to keep the plants happy, but this is the first time I've actually tested the soil to see how it's holding up.  Turns out that my soil is low on Nitrogen and Phosphorus, but a little high in Potassium. 

Nitrogen is essential to good stem and leaf growth; phosphorus is for root, seed, flower, fruit growth; and potassium is for root growth and overall plant health.  So my soil is all set to keep plants alive, but they may not grow well, or fruit/flower/seed well.  From what I can find, it looks as though my best bets for keeping things growing well are a starter of fish emulsion to get them growing followed by compost added to the beds, and fish and/or kelp meal to add micronutrients and more phosphorus.  I really aught to just dish out the cash for a professional soil test to find out what levels of micronutrients and microbes my garden has.  I know it has more than its fair share of slugs, and it's no wonder with all of this rain.

Whatever the case, I am getting more and more disappointed by the weather and feel like I'm falling way behind on things.  Luckily I do have seedlings that are doing great and can stay inside longer if needed, it's worth the late start to protect them against powdery mildew (the scourge of too early plantings).  I just need them out of the house before they get too big!

Sunday, March 4, 2012

Cherry Tree Achieved, And Other News


With two whole rain-free days over 50 degrees, I have made the most of the nice weather.  Yesterday my daughter and I finished up weeding the beds, cleaned out the strawberry bed, laid down another bag of bark mulch, and trimmed the candytuft and dead daylily leaves from last summer.

Cleaned up strawberry bed, only the strong were left behind. Still looks pretty messy.

One of the reasons I didn't join in the garden frenzy of getting things planted this weekend, like so many other gardeners, was that my beds are still completely shaded by the fence.

A few more weeks and the front edge of the beds will finally see some sun.

More importantly, my dwarf Bing cherry tree finally got put in the ground.  My husband was kind enough to do all the hard work of raking off the top layer of lava rock and digging the hole.  Then we poured in a small pile of compost, spread the roots around the pile, and held the tree in place while filling the hole in around it.  My fingers are crossed and I'm hoping it will do well. 
View of the cherry from the road.  Not much of a view yet.
Cherry tree, between the new sprouts of the daylilies.

The next thing on my list of garden to-do items is planting the camellia.  If I don't collapse in agony after that, it's back to work on the blackberries.  I might just be able to get ahead of them before they really start growing. 

Tools are all ready for the camellia.
Camellia all ready to be planted. Only one not ready is me!
Hope everyone's out there enjoying some sunshine!

Thursday, March 1, 2012

Potato Culture

There is a wealth of information out there about potatoes, the Wikipedia entry alone is full of potato facts.  In fact, reading up on them has given me a whole new appreciation of french fries.  It's kind of amazing to think that the potato we eat today is the descendant of potatoes first cultivated between 7 and 10 thousand years ago in Peru and Bolivia.  Even more amazing is that there are over 5000 varieties of potato today 99% of which were developed from a subspecies that grew in south central Chile.  That's quite a history.  The Spanish brought the potato home with them after their conquest of South America.  From Spain and other ports of Europe the potato spread across the world and today it is eaten in nearly every nation on the planet. 

One of the reasons for its popularity is that the potato is well-adapted to most climates; it can also be grown in a backyard garden in quantities adequate to provide for a family's sustenance; it grows easily; and is much less expensive than grain crops.  The potato has been a crop to grow at home for centuries, since potatoes have particular storage requirements they didn't keep as well as cereal grains and therefore were less market-worthy and more likely to be found in individual gardens.  This is part of what led to the Irish Potato Famine, the poor Irish tenant farmers fed their families on milk and the potatoes they grew on their small allocated plots.  Nearly all of the potatoes grown in Ireland at that time were a variety known for large harvests, which made sense when you were short on growing space and had a family to feed, but not at all resistant to late blight.  A particularly nasty year led to rampant infections of late blight taking out nearly one half of the potato crop in Ireland; and leading to the deaths of nearly a million Irish, and the emigration of more than a million others, effectively reducing the population by 20-25%.

Potato plants
Why mention the Irish Potato Famine in a blog post about potato gardening? Yeah, it is a little morbid.  But it's an important example of the folly of dependance on a single cultivar, or a single staple crop even.  Genetic diversity in food crops is something to be coveted, having a multitude of available cultivars offers people protection in the event of another devastating loss like the Potato Famine.  With that in mind, if you plan to grow potatoes, make an effort to try some lesser known varieties and get familiar with potatoes all over again.  One of the major reasons Russet potatoes are so common in grocery stores is not their flavor, or nutrition, or ease of production.  Can you guess why the Russet is found everywhere?  Because it can be shipped everywhere.  Russet potatoes are one of the longest-storing varieties, they can be bounced around, stored for months, and are none the worse for wear.  I am looking forward to getting familiar with my German Butterball potatoes, and learning what traits they have to offer other than shipping stability.

I recommend doing further reading on Wikipedia to learn more about the history of this plant, but I think I should move on to growing information at this point.

Potato plant in planting bag
Potatoes are grown from "seed potato" which is not a seed at all, it's a potato.  The "eyes" on a potato sprout and grow into a new plant.  You don't even need whole potatoes for this, just chop them into chunks with at least one eye on each.  Bury them in rich soil about 6-8" deep.  Keep them well-watered, with good drainage to avoid overwatering. 

Potato growth happens in 5 phases: first sprouts grow from the seed potatoes and roots begin to grow as well.  The second phase involves photosynthesis as the plant's leaves grow.  Phase 3: stolons develop from lower leaf axils on the stem and grow downwards into the ground and on these stolons new tubers develop.  Often, this phase is also when flowering occurs.  Tubers will stop forming when the temperature hits 80 degrees, this is why potatoes are considered cool weather crops.  The next phase involves the tubers growing larger.  The final phase involves the leaves and stems dying back, the skins of the tubers hardening, and the tuber sugars converting to starches.  You can harvest at this time, or during the fourth phase you can hand-harvest "new" potatoes while leaving the plant to continue growing more.

An important thing to remember about potatoes is that they are from the nightshade family and do contain small amounts of the toxin solanine.  To ensure that you don't become sick from your potatoes, never eat green potatoes.  Tubers will turn green when exposed to light; in the garden you can prevent this by keeping tubers that show above ground covered with dirt or a heavy mulch; once harvested store potatoes in a brown paper bag to reduce light exposure.  Also, after flowering the potato plant may develop fruits on it, these are toxic and should not be eaten.  For the home garden it may be best to pick all of the potato flowers when they fade to prevent accidental ingestion of the fruits by children or visitors.  Potatoes are generally cured in order to allow for skin-set, and increase storage capability.  Similar to winter squashes curing is done by setting them out in a warm, almost hot! place for several days.
Potato flowers

Potatoes make a very pretty flower and could be interplanted with annual or perennial flowers easily, without it being obvious that they are food plants.

I hope this has been as helpful to you as it has to me, and look forward to getting my potatoes started and seeing how well they do. 

Monday, February 27, 2012

Love Lettuce

Despite the fact that the seeds were planted Saturday night, and it is now only Monday morning, I spotted the tiny white slivers of lettuce stems in my pots today.  I am just amazed at how fast that was.  Optimal conditions for germination make a big difference.

Also, I called this morning for location services to ensure that planting my cherry tree won't involve electrocuting myself or bursting a water line... if it's a problem I will just have to look into a different location for the tree.  I probably should have done this before buying the tree, but oh well, live and learn I suppose.

That's all for today, hoping to get a chance to post a lettuce culture post soon so keep your eyes open for that.

Monday, February 20, 2012

Drowning in Berries

I have already discussed strawberries to some extent, how they grow and how to care for them in Strawberries, The Ultimate Food Crop.  I did not include recipes and preserving directions though since I was pressed for time that day.  So today we will cover what to do with all of those strawberries.

The first few days of finding ripe strawberries will likely be filled with fresh eating, strawberry shortcakes, and sliced strawberries in your cereal bowl or on your salad... but a few days later you'll find the novelty of it wears thin and long for a way to save those flavors for the winter months.  Luckily by this time your strawberries should be in full fruit.  If your patch is small and you are still only harvesting a few berries here and there, go out and pick some at a local farm and use them for these recipes.

There are two primary ways to preserve your strawberries, prepared or frozen.  Some ways to prepare them include making jams, pies, or syrups.  If this is too much hassle it's often easier to just wash and hull the berries, then lay them in a thin layer on a cookie sheet, freeze them like this and then bag them up.  This method of freezing keeps the berries from freezing into one solid lump, instead you can remove what you need to defrost from the bag and put the rest back in the freezer.

Making prepared strawberry recipes is more time consuming, but pays off when you can pull a strawberry-rhubarb pie out of the freezer at Thanksgiving and throw it in the oven right away, or pop the lid off a jar of strawberry jam and enjoy the taste of summer in February.

Jams are what most people think of when they consider preserving strawberries.  They are incredibly easy to make, keep well without needing to be pressure canned and are a product used in most households year round.  There are a number of recipes for jams available and depending on your own tastes and preferences you can choose the one that best suits you.  A standard jam recipe such as is found inside a pectin package can have up to twice as much sugar in it as berries; this will give you a very sweet jam and sometimes sets too firmly leaving you rolling a chunk of strawberry Jell-O across a slice of bread. 

Many pectin packages also include reduced sugar recipes, these cut down on the sugar which in turn can effect the jam's firmness and leave it runny.  They are not as sweet and allow more of the berry flavor through, however the reduced sugar is also more likely to cause the jam to brown in the jar.

I am still trying to find a perfect canned pectin jam recipe, each year I try a few in hopes of making the perfect jam.  Freezer jam on the other hand is so simple my toddler can make it.  Select a pectin designed for making freezer jams, mash up berries and scoop the required amount of berries into a bowl.  Mix in required amount of sugar and pectin for a few minutes allowing it to dissolve completely.  The pectin brand I use calls for 1 2/3 cups fruit, 2/3 cups sugar, and 2 Tbsp pectin.  This makes 16 oz. of jam, which you then scoop into freezer safe containers (leaving head room for expansion) and put into the freezer up to a year.  Freezer jams aren't cooked so they tend to be runnier than cooked jams, but being uncooked also means more of the bright fresh strawberry flavor.  Of course to make freezer jam you also have to have a large enough freezer to hold it, and once it's opened freezer jam will spoil faster than a cooked jam.

Last year I bought Ball RealFruit Pectin in "flex batch" containers that turned out to be really helpful with making small batch jams.  Instead of using an entire pectin packet to make a huge batch of jam I can measure out how much pectin I need based on how many berries I have on hand. 

I also found a pectin-free jam recipe last year that I had to try purely because it meant one less thing to buy in order to make my own food.  The pectinless recipe came from Clearly Delicious:An Illustrated Guide to Preserving, Pickling, and Bottling by Elisabeth Lambert Ortiz.  It requires a bit more work, but I definitely appreciate being able to make jam without running to the store for pectin.  For this recipe you need 4 quarts of strawberries (4 lbs.) crushed, 2 Tbsp. lemon juice.  Simmer these until berries are soft.  Add 7 1/2 cups warmed sugar over low heat and stir until well mixed.  Increase the heat and boil rapidly without stirring for 15 minutes or until it reaches setting point.  Candy thermometer should read 220 degrees.  Skim off froth, cool slightly then pour into sterilized jars and water bath process them.  I don't think my jam using this recipe cooked quite long enough, it turned out a little bit runny, but it tasted fabulous and I can appreciate that this recipe contained far less sugar than most of the others.

One thing to note about strawberry jams: if berries aren't completely crushed the air pockets inside them will cause them to float to the surface of your jam and this can make them discolor leaving you with unappealing brown berries at the top of the jar.  Crush them well to prevent this.

Looking for a strawberry rhubarb pie recipe (since I have no rhubarb yet I have never made one) I found this site and was amused by the author, plus it links to the recipe she used.

 You can also make up these pies into single serving pie-in-a-jar, for days when you have no one to share with.  A recipe for this can be found at Adventures in Sustainability and is usable for any fruit pie.  Be sure to tell her who sent you. ;)

So there you have it, some easy and some not-so-easy ways to deal with excess strawberries.  If they survive long enough to be "excess".

Thursday, February 9, 2012

Ask and Thou Shalt Receive

Please feel free to make any suggestions on topics to cover in the comments (which I believe I have finally gotten fixed).  I do plan to cover as much as possible in culture, recipes, and general gardening, but if readers have suggestions of what they'd like to see I'd be happy to work on those first.  Also, any questions regarding particular topics will be responded to as fast as possible, I would love to have reader input and am happy to help with any questions or concerns.  Even if that means referring you to another website for guidance.

Wednesday, February 8, 2012

Make a Note

Well, the beautiful weather has gone back to a moist gray chill.  I suppose I will be back in the house for another week or two.  That's okay though, since I wanted to bring up the topic of notes.

Taking notes on your garden seems like a waste of time, but in reality it is rather hard to remember the date and conditions of planting a specific seed for a year or more.  As your garden gains more plant varieties and you start to push the limits of what you know, it's important to write these things down so that next year as you select tomato seeds you can refer back and remember that Brandywines were good producers, but Legend struggled in the bed it was in.  You can make a list of what seed you have at the end of summer, so your new order in Spring doesn't accidentally double up.  You can look back at some misconceptions you had and remind yourself not to do those things again.

I tend to get so excited about gardening by springtime that I put plants into the ground too early, or start them in the house too early and have sad spindly plants by the time the weather has warmed enough for them to go outside.  I have to make a note to remind myself that curcubits don't actually like the weather in Oregon in May, they get too cold and wet and end up with mildew issues.  If I use this information next year I'm more likely to hold off until June.  I also keep notes on what seeds were planted inside, outside, and at different times; what day they were ready for harvest; what sprouted well and what didn't; and what the weather was like.

Taking notes is like slowly building up a Farmer's Almanac that is based on your specific location, crops, and experiences.  You may plant rhubarb this year, have it die, then 6 or 7 years down the road think, "Oh, I should plant some rhubarb, I like rhubarb!" but not remember the circumstances that led to its death the last time and end up having the same thing happen again.

Note taking doesn't have to be really intensive, if you're a journaler by nature keep a little leather bound journal next to your garden gloves, or keep a cheap spiral bound notebook if you prefer.  If you're a blogger, type it all out in a blog.  I am lucky to have an iPhone that I keep on me nearly always, I use the Notes app to type in notes on what day it is, what the weather has been like, what seeds/plants are growing and how they fare, and this year I will add to that what sort of harvest I see from each.  I almost prefer to do a voice-to-text note taking; I am not a skilled typist and even less so on the iPhone keyboard, it's tedious to take notes that way but it's always at hand and is durable.  Plus I back my notes up with Dropbox so if my phone is lost or damaged I will have a backup copy safe and sound.
Sample of notes in the Notes app.

Note Dos and Don'ts:

-Do date your entries!
-Don't write a book, this is just some notes not a novel.
-Do list plant varieties as well as types, and anything special about them.  Indigo Rose (determinate, blue, slicer, hybrid) tomato produced 3lbs. by July 8th.  Oregon Spring (determinate, slicer, hybrid) produced 5lbs by July 8th, first tomato of the year ready on June 12th!
-Don't keep notebook in your bookshelf in the office or library.  Keep it close to hand to ensure you will keep it up to date.
-Do keep up with note taking throughout the year.  How much harvest and how long your preserved harvest lasts will be helpful in deciding how much to plant next time.  Jan. 31st 2012, still have 14 jars strawberry jam, and 20 jars freezer jam; ran out of frozen strawberries.  40 jams is too many, freeze more whole berries next time. 
-Don't forget to keep track of trials on new things! April 2nd, 2012 laid pennies around two cabbages to test for slug repellent, check back in two weeks.  April 16th, 2012 cabbages surrounded in pennies show less slug damage than others, will continue with penny use.

Sunday, February 5, 2012

Thinking on Trees

The few days of beautiful February weather got me kicked off to a good start on my yard work, which means I haven't had as much time to sit around the house and blog.

Yesterday I got the pleasure of raking the yard and laying down bark mulch, as it turns out 4 cubic feet of bark doesn't come anywhere near what I will actually need to finish the yard around our patio.  I was surprised at just how little it did cover, today I will go back to the store and get another 6 bags (since that's likely all my car can carry at once) and see how much farther it gets me.

In the meantime I am on a mission to discover what would be the best plant to put in the front of my house, where it is bare and gets no shade at all in the summer from about 2 pm to sunset.  If I can come up with something attractive with flowers or fruits that will shade the house it could make a big difference in our cooling bill during the summer heat, and provide food or bouquets or at the least a nice centerpiece to the house.  I have considered a lilac, but am thinking that it may be too slim to make much difference in shade.  I've also considered trellising grapes, wisteria, or clematis, but again I am not sure they would get large enough to provide much shade.  An evergreen could make a statement, and won't make a big mess like deciduous or fruit trees, but it also won't make a floral show in spring or fruits later in the year.  The other option that came to mind was a cherry tree, or other fruit tree that wouldn't require cross-pollination.  I'd have flowers, fruits, a mess to clean up, and a shade tree large and branching enough to make a difference.
This time of year the house is shaded, but by summer there will be nothing to keep it cool.

The annuals are not nearly so difficult to decide on since they change each year, but a tree is a big deal.  It will be there for years, and probably won't produce much for several years after planting, I need to be absolutely certain before selecting a tree to put into the yard.

When you are considering a semi-permanent to permanent change to your landscape here are some things to keep in mind:

-How big will it get?
-How much maintenance will it require?
-Will it drop fruits or leaves that need cleanup each year and do you want to take on the extra work?
-Will the planting location make a difference in other things? Will it shade the house, or garden?  Could the roots grow too large and damage sidewalks, driveways, or water pipes?
-What are you trying to gain from the planting? Shade, flowers, food, etc.
-If it is a fruit tree, will you need more than one for pollination?
-Will you move before you can reap the benefits of the plant? If you expect to move in 3-5 years it doesn't make much sense to plant a tree that won't offer much shade for 10 years.
-If you select for appearance, be sure to take the time to find out if your tree or shrub is native, and if it has many known pests or diseases.  If you select something for its health to begin with, you will have fewer worries later on.

The Arbor Day Foundation can be a great resource for learning about trees, and even offers 10 free trees selected for your area as a membership incentive (they also offer member discounts for the purchase of trees). This can be a great way to get some trees started in a larger landscape, or you can ask friends or neighbors if they'd be interested in sharing your 10 trees.  The small donation/membership cost is worth it if you are planning to add trees to your yard, but aren't necessarily seeking specific types.  When I joined a few years ago it was primarily just to make a donation to what I felt was a worthy group, I ended up sending my free trees to my nephew who has several acres and raises fowl as well as a garden, he made good use of the trees which I didn't really have the space for at the time.

I am definitely leaning toward a cherry tree, however there is some debate over what type; my daughter likes sweet cherries, while I prefer to preserve pie cherries. There are combination trees available, but I have never seen one that did as well as separate sweet and sour trees.  Next stop, check with the local nursery on good selections for our area, and do a little research on planting a new fruit tree.


Wednesday, February 1, 2012

Strawberries, the Ultimate Food Crop

Strawberries are perennial plants that reproduce primarily by runners.  Each year they shoot out a stalk, called a runner, that touches the dirt and begins to grow the roots and leaves of a new plant.  This type of reproduction means that a small planting of strawberries can expand into a large strawberry patch in just a few years.  Such simple reproduction also means that strawberry plants tend to be one of the least expensive fruits to purchase and grow.  In May of 2009 I bought a dozen bare root strawberry plants for $5, by 2011 I had a 10 foot by 2 foot bed filled with over forty plants that produced 2-6 cups of berries every other day from June to mid-July.

Once established a strawberry patch can be an excellent producer of these tasty berries.  They are very hardy plants that don't take a lot of care.  In fact, my patch of berries doesn't generally receive any water between the first week of June and last of August.  Summers here are very dry, though not generally very hot.  If they looked thirsty I would water them, but haven't needed to since the spring they were planted.  My strawberries are planted in a space that was mulched with red lava rock, they seem to do well with the rock as a mulch to keep out weeds and shade their roots.  Once a year, in early spring, I clean out all of the dead leaves and remove any sickly looking plants.  The dead and dying plant matter can harbor molds, fungi, and slugs, so I make sure to keep the ground around the plants clean.  I also slug bait just as the first blossoms come in to keep the slugs in check until harvest is over.  Supposedly a strawberry bed should be dug up and a new one planted every 4 years or so, since my bed is only 3 years old I haven't yet done that.  I may leave it in place until I actually see a decline in the health of the plants or fruits.  Since I remove all the dying plants and let any new runners (so long as they stay in the bed) grow, my strawberry plants are constantly being renewed.  I am not sure if the soil's fertility will be affected though, and that may be the only reason to move the strawberry patch in the future.
One day's harvest, notice only some of the berries are fully ripe.

One thing I have learned about growing strawberries is that you actually should pick the berries the day before they are perfect.  I have found that if I leave a not-quite-ripe berry on the plant and come back the next morning it will be perfectly ripe... and have a HUGE hole through it where a slug beat me to the harvest.  I don't know how, but the slugs have a nose for when a berry has reached its peak of perfection and I just can't seem to beat them.  Instead I pick the berries just less than ripe, in the end this serves me well since a perfectly ripe berry will turn to sweet mush after being frozen.  Also strawberry jam made with all-ripe berries is almost too sweet, less ripe berries tend to make a more flavorful and less sweet jam.  I'm not saying that I pick them while they're still green; they are red, but a light red rather than the darker rich red of a fully ripe berry.  Also, if berries have over-ripened, been chomped by something, or have mold on them; remove them and dispose of in compost.  Berries shouldn't be left on the plant to go bad, they will grow mold and that will spread to the new berries still forming.  Remove any damaged fruits as you do your harvesting and toss into a bucket for composting.
Strawberry patch viewed from the gate, they are slowly invading the empty lot next door.
The one downside to having your own strawberry patch is just how sick of picking strawberries you'll be before they are done each year.  My children are terrible strawberry pickers too, they miss any berries that aren't right on the edge, so it is up to me to pick every couple days or let the berries go to waste.  For the first week or two that's not so bad, but 6 weeks into it you may begin to wonder why you didn't plant them in beds 4 feet off the ground!  You also do have to be somewhat careful about planting strawberries right alongside your annuals.  They spread and could fill up an entire garden bed that was meant to hold tomatoes if you let them, to keep them in check, trim off any wandering runners once they develop a root and a few leaves.  Give these starts to a friend to start their own patch with.

In conclusion:
-Strawberries will spread, keep runners in check to avoid being overrun.
-Keep bed clean to avoid the most common issues with strawberries: slugs and molds.
-Slug bait and harvest early if slugs are a problem
-Mulch beds with something that won't biodegrade to protect roots and fruits without being shelter for pests; black plastic, pebbles, lava rock.
-Take a Tylenol and keep on picking because by next May you will really be wishing you'd frozen more of these fabulous fruits.

Wednesday, January 25, 2012

Deadheading Doesn't Mean Following Jerry Garcia Around

So say you bought a cute little pansy plant, it's brimming with blossoms, looking healthy and beautiful.  You bring it home from the nursery and gently plant it into a nice roomy pot hoping to have a large pansy plant pouring blooms over the sides of the pot in no time.

You water it daily, you add a little fertilizer when the blooms start to fade, and wait patiently for new blooms to follow in their wake.  Nothing happens.  The plant is healthy, it continues to grow, but there are very few new flowers coming and it's starting to look like a foliage plant instead of a flowering plant. 

Deadheading is the process of removing the dying blooms to encourage new flower growth.  Most gardeners already know this, and practice deadheading regularly.  More important than simply understanding that you need to deadhead your flowers is knowing why you need to, what happens if you don't, and what that translates to in other parts of the garden.

Plants are working with a limited amount of nutrients, sunlight, and water with which to grow.  Annuals have to do all of their growth, flowering, and seeding in one year.  So think about it this way, if you put a pansy seed in the ground the first thing it does is grow roots, stems and leaves; this is like a baby learning to eat before learning to walk or talk, the stems support the leaves which in turn reach to the nearest light source to feed the plant while the roots dig deep to support the growth and pull in nutrients from the soil.  So your little plant has learned to feed itself, next it will try to reproduce (luckily babies don't get a jump start on this one). Most plants reproduce by exchanging pollen between flowers, so the pretty pansy flowers you select are actually the plants sexual organs.  What lovely ovaries you have, little pansy!  Your plant develops these sexual organs in an attempt to achieve pollination (or fertilization), once a flower has been pollinated the petals will die off as they are no longer necessary to attract bees and other pollinators, and the plant must redirect it's limited energies to growing seed from the ovaries at the base of the flower.  Grow, fertilize, reproduce.  This is the basic life cycle of a plant. 

Where does the benefit of deadheading come in?  Your plant grows, puts out flowers to reproduce, then... you pluck the flowers and soon to develop seeds with them.  You have stopped the cycle, so the plant responds by trying again: reproduce! You pluck again before seed development. The flowers just keep coming as the plant struggles to meet the deadline of fall frost to have fully developed seed to grow the next season.

Apple and hazelnut trees grown out of control, pruning helps keep trees healthy.
A lot of new gardeners struggle with the concepts of deadheading, pruning, and pinching off new growth.  It's hard to accept that you need to remove healthy (and unhealthy) growth from a plant to improve it.  Even seasoned gardeners have difficulty pruning a fruit tree if they imagine all the fruits that branch might produce.  Keep in mind that growth is good, but some growth is not.  Overgrowth in a tree can cut down air flow through branches leading to mold and fungus growth, dead flowers left to seed on a annual will make it leggy and bare, and too many flowers in a tomato plant can lead to an overabundance of poor fruits. 

Remember that a plant is working with a limited nutrient supply.  Your apple tree or tomato may put on tons of flowers, but if they aren't able to pull up adequate nutrition from the soil and sun, the fruits that develop may be tasteless, small, or susceptible to pests and diseases.  Far better to trim down excess branches or flowers and ensure that the crop that reaches maturity is of the best quality.

My dad's property has an apple tree that has probably been there for eighty years, it is beautiful in full bloom.  Dad never pruned it, and insisted the fruits on it were not worth eating, several years ago one of the largest branches broke off and I helped him to remove it.  I told him it needed to be pruned, by at least 1/3 of the branches.  He was uncertain at first and was afraid it would harm the tree beyond recovery.  Finally I convinced him and we took out all but the 3 largest branches, and a few smaller ones.  The tree is still alive and I'm happy to report that the apples that year were some of the best he'd ever gotten from that tree.  Deadheading, pruning and pinching plants are methods of removing growth that impairs the plant's ability to produce the very best that it can.  Keep this in mind as you cringe and fret with pruning shears in hand.

Tuesday, January 24, 2012

Pea Culture

Hopefully I can get a few posts about the culture of different veggies up before spring comes along, to help out gardeners trying new things; on that note, this post is all about peas.

Pea plant in full fruit.


Peas originated in the Mediterranean and Middle East regions, they are eaten fresh or cooked.  They can be frozen, canned (pressure can method), or dried.  Peas are harvestable between 50 and 75 days depending on variety.  There are three primary types of pea; the snow pea, snap pea, and shelling pea.  Shelling peas are removed from the pod and only the pea seeds are eaten as the pods are tough and tasteless.  Snow peas are the variety most often seen in stir fries, whole pods with smaller undeveloped seeds inside.  Snap peas are eaten in the pod as well, but are even sweeter than snow peas and have a crisp, thick pod that is nearly stringless.  Depending on which way you prefer to eat your peas you could plant one, two or all three types of pea in your garden.

Peas are one of the first things planted in the spring, they can germinate in soils that are only 40 degrees F.  So long as the risk of hard frost has passed they can go directly into the garden.  Peas should be sown in the ground, rather than started indoors.  They are long and slim vining plants and don't always cope well with transplanting, they are also such fast growers, and have such large seeds that it's just much simpler to put them in the garden.  If they fail to germinate in a week or so, plant another round and keep waiting.  Pea seeds should be planted fairly deep, about an inch underground.  They take up little room and require little nutrition, they can be planted as close as 1-2 inches apart.  Or in SFG style, 8 plants to a square.  Pea seeds will only be viable for about 2 years, so despite their inexpensive price don't be tempted to stock up too much.  Peas are very easy to save seed from, simply leave the end-of-season crop on the vine until they brown and become dry, then harvest, dry further inside, then shell and store seeds in paper bags. (Avoid plastic bags as they can trap any remaining moisture and rot your seeds).  Peas also self-pollinate, they don't require pollinators, and generally each flower will pollinate itself.  This means that to accidentally cross two pea plants you pretty much have to rub them together.  Pea seed will fairly reliably produce seed that grows the same plants as the previous generation.

A cool season crop, peas prefer temperatures below 70 degrees.  Peas that mature in temperatures over 85 degrees can develop tough pods.  Also, peas stop putting on flowers once temperatures get over about 85 degrees.  Harvest continually to ensure continued production of fruits.  You can increase your harvest by using a pea innoculant, but innoculant in no way guarantees a great harvest. 

The greatest risk to peas is the enation virus, and you should watch for enation resistant varieties when selecting peas for your garden.  Peas actually build nitrogen stores in the soil they are planted in, so are a great winter crop or rotation crop to keep in the organic garden.  Move them around each year, or start an early spring crop in the space of later heavy feeders.  By the time the peas are finishing their growth the heavy feeding summer plants should be ready to put outside.

As vining crops peas will need a trellis of some type, which also helps to keep the fruits up off the ground and in easy picking reach.  Peas are an inexpensive, simple to germinate, delicious crop to grow and are perfect for gardens that have small children around.  Kids can pick them easily, eat them straight from the vine, watch how they grow and twine around each other and the trellis.  In general peas are a great crop for anyone.

Snow peas, purple beans, and zucchini: one day's harvest.
I prefer to grow the snow or snap peas, shelling peas are so easy and inexpensive at the store it just doesn't make sense to use up garden space on them, snow and snap peas are expensive though.  Plus, I don't look forward to all that shelling.  Snow peas are delicious eaten fresh, they can also be blanched and frozen for eating throughout the year.  Snap peas are also delicious fresh; sweet, crunchy, and very low in calories; snap peas do not store nearly as well though and can become mushy if frozen or canned.  I suggest growing primarily shelling or snow peas, with a small bunch of snap peas just to eat fresh.  Last year I planted 6 squares of peas, each square holding 8 plants and I was overwhelmed with the quantity of produce I harvested from them.  It may not seem like it at first, but over time, as round after round of peas is ready to pick you will find that each plant is actually very productive.  How many peas (in the pod) will you eat each day?  However many you think that is, that's probably about how many plants you need.  I will happily eat my way through 20-40 pea pods in a day, and my husband and kids rarely eat them.  So I need 20-40 plants to produce that amount, if I plan to freeze them I will have to plant more.  This year I am putting in more than last year because I only ended up with 2 quarts of frozen peas and would like to have more than that for next winter. 


Next time: Pea Recipes, My Own and links to others.

Monday, January 23, 2012

Easy Plants Are a Myth

People often say that a certain plant is easy to grow, or difficult to grow.  I say it's BS.  Supposedly a great easy to grow plant that even a kid can plant is sunflowers.  Well, I have planted mammoth sunflowers many many years and they've always either failed to sprout at all, or grown the saddest spindliest flowers I've ever seen.  Last summer however my 3 year old son was helping in the garden and I gave him a couple sunflower seeds to bury just so he could plant some seeds that were large and easy to manage.  His two sunflowers topped 12 feet in height, they also put out flower heads that were a good 12 inches in diameter.  Maybe it was just better soil? Nope, I put in a few sunflowers too. Planted them at the same time and they only grew to about 6 feet and had 6-8 inch flowers.  I have no idea why, but the sunflowers loved being planted by the small boy.

Among the so-called "easy to grow" plants most people list perennial herbs, tomatoes, pumpkins, summer squash, annual flowers, and hardy greens like kale and chard.  If you are just starting out with gardening give these plants a shot, but don't give up hope if they don't do well.  Sometimes it will just turn out that you have a knack for celery (known to be a very finicky plant), while tomatoes fiercely dislike you.

My brother built a massive greenhouse and garden last summer, on my parents' property.  The garden there has been producing piles of tomatoes and summer squash for nearly 20 years.  He saved the hot crops for the greenhouse, but continued the tradition of putting summer squash in the garden, he also planted peas, turnips, carrots, kale, broccoli, and chard.  While this was the first year he managed such a large garden he is an experienced gardener.  Guess what? Everything in the garden did great... except the squash, and the peas.  For some crazy reason last year the only things that would grow well in that garden were root veggies and brassicas. 

Some crops are considered easy because they have few known diseases or predators, or because they can withstand some drought or flooding.  Very few veggies should be considered easy to grow, nearly all of the vegetables people plant are so carefully bred that they are entirely dependent on human kindness for survival.  Kale is one of the few that could probably manage on it's own, and in hot climates it is challenging to grow outside of the winter months.

Often when you have difficulty with a certain plant it is not because the plant is difficult but because you don't yet have an understanding of what it takes to make that plant happy.  Since a pumpkin makes a very small root compared to the massive amount of aboveground space it takes up, it doesn't generally need a lot of well worked soil.  The pumpkins roots won't spread much, they can be put in a 6" pot in a hole full of rocks and be content so long as their 6" of dirt is highly nutritious.  Meanwhile, carrots sprout from very tiny seed that then sends down a tap root, while carrots don't actually bulb like an onion (so they can be spaced fairly close) they are rather delicate and need their soil loosened and fluffed to make growth straight down easier.  If you've got heavy soil and only loosen the top inch or so, your carrots will never do well.  I have never yet been able to grow carrots well.  This year I plan to try again in the "Mel's Mix" soil, in hopes that it is light and fluffy enough to keep carrots happy.


Once you get a handle on what the plant needs to be happy you will find it easier to provide those things and have a very "easy" plant to grow.  For me, one of the "easy" plants I struggled with was pumpkins.  I put them in the ground and they got powdery mildew, or didn't sprout, or didn't grow beyond a sprout, or grew long and happy and healthy but didn't produce any pumpkins.  Each year I learned a few things so that I got a little closer to pumpkin perfection.  Initially I had it in my head that pumpkins were colder weather plants, it seemed reasonable since they aren't harvested until fall, I planted them in March and my seeds didn't sprout.  The variety I was growing needed about 100 days to reach harvest, so I figured out that I needed to start them indoors to keep them warm until the weather improved, this also helped prevent the mildew that sets in during the wet months in spring.  Once I had a good start going and the weather improved I moved it into the garden bed, but that year I let them sprawl and only had room for one plant: it grew well but no pumpkins developed.  Finally I began trellising, it gave me enough room to grow three pumpkins in my small space and finally had the cross-pollination needed to produce some very healthy fruits. 

Gardening is a learning experience, each year you find that you get a little better at managing the plants you grow and get a little better fruit or flower in return.  It's a struggle at first for most people, but it does get better.  You may never be able to get the hang of sunflowers, but you may grow the best turnips in the county instead.  There is no such thing as an "easy" or "difficult" plant, it all depends on the gardener, the garden, the weather, and how many butterflies flap their wings in Taiwan.  Gardening is truly an experiment in chaos theory unlike any other.