Showing posts with label container. Show all posts

Tuesday, April 10, 2012

A Picture is Worth a Thousand Words

Tulips, pansies and a cedar tree.
The first color of Spring came in these gorgeous tulips that were nearly as pretty before they bloomed due to the fabulous spotted stripes on the leaves.  The little potted cedar was a find from the front yard that I am planning to bonsai.  It needs a shallower pot though.

Volunteer sunflower.

Kale planted in January.

The "winter cabbage" that is not.
The kale in the whiskey barrel are bigger than the ones started inside now.  I have been tempted more then once to go pick all the leaves off them because I'm craving fresh veggies.  Also the winter cabbage that I rescued before turning over the big bed appears to actually be a broccoli, and is bolting now.  I guess growing for 9 months without getting anywhere made it decide to just cut its losses and start making seed.

Seedlings getting some sunshine.

Between-the-beds space all finished.
I've had my seedlings out most of the day every day this week, they are soaking up the sun and growing incredibly fast.  The space between my two large beds is all done now; weeded, un-lava rocked, planted with perennial herbs, and barked.  When the herbs grow in a bit it should look great!

Garden bed this week.
It's hard to tell but this bed has actually had some growth happening.  The cat screens make it harder to see.  The peas in the back row are just popping up, in another week or so I should be able to remove the screens and really see the difference.


Last of the pictures: I was this close to having all of the bark in the garden done... ran out about 4 square feet short.  /facepalm  Which means yet another trip to Home Depot this week.

Thursday, March 8, 2012

Some Days the Writing Doesn't Come So Easy

I'd like to say I've been busy in the garden and that has slowed my postings.  Sadly, that's not the case.  Instead I've had to deal with chores, kids, planning dinner, washing laundry, and the weather.  This week has gone from rain and hail (Monday), to snow (Tuesday), to bright sunny days w/ freezing temperatures (Wednesday and Thursday).  It is supposed to warm up on Friday, it is also supposed to start raining on Friday.  I just can't seem to win against the weather, either the soil is frozen or so waterlogged it can't be dug in.

Despite the fact that I desperately need to turn my beds over and amend the soil I will have to wait out the weather for that.  This means I can't plant my peas, garlic (yes, I know, I should have planted it in November) or onions yet.  In fact, while other gardeners are planting things left and right, I am stuck waiting for soil to warm and dry out a bit, and the shade to move.  The only thing I can plant right now is my potatoes since they are going in pots; of course the potting soil I have for them is frozen solid, which means they too have to wait.

The cherry tree and camellia don't seem to be the least bit phased about the weather, in fact they are both starting to show signs of new leaf buds.  I must've done something right!

Hope things improve outside soon, if my starts get too big I won't have room for them under the grow lights.

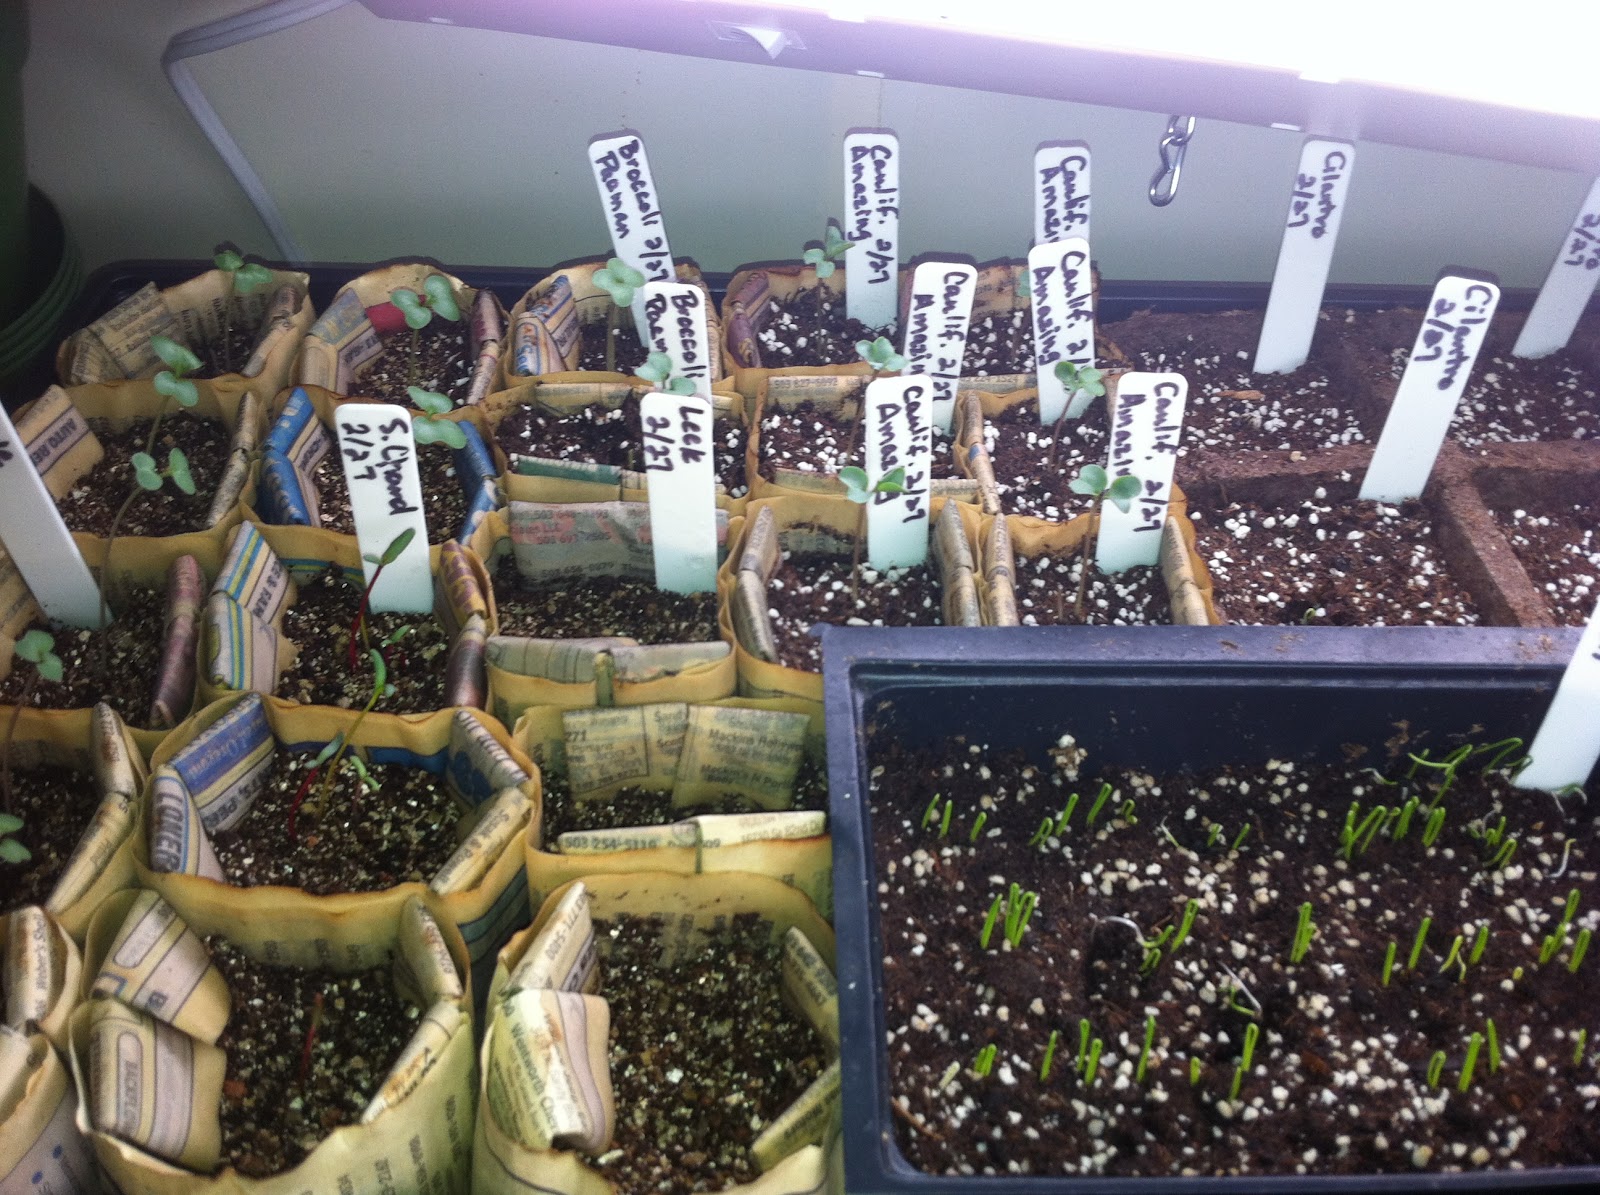
Today's seedling update:  Things are doing well; I planted too many lettuces in each pot, after some thinning I have decided I'm just going to have to move a bunch into other pots.  The final sprouts to pop up were the leeks, which are just beginning to show. 

Tray 2-planted 2/27 most of these have sprouted, though some aren't above the soil yet.

Tray 1- 2/25 everything is sprouted, lettuce are putting on first true leaves.

Who knew artichoke made such pretty little sprouts?  Hoping these won't get too big before I can move them outside and separate them.
 I ended up adding the 4' light fixture to the upper shelf because the littler ones just weren't cutting it.  it hangs over the washer a few inches, but really, who cares about clean clothes when there are plants to grow? I just have to remember to lift it out of the way to wash clothes; we don't really have to go without laundry.

So that's the news for now, I am chomping at the bit to get the garden in action.  I'll just have to rein it in a little longer.

Thursday, March 1, 2012

Potato Culture

There is a wealth of information out there about potatoes, the Wikipedia entry alone is full of potato facts.  In fact, reading up on them has given me a whole new appreciation of french fries.  It's kind of amazing to think that the potato we eat today is the descendant of potatoes first cultivated between 7 and 10 thousand years ago in Peru and Bolivia.  Even more amazing is that there are over 5000 varieties of potato today 99% of which were developed from a subspecies that grew in south central Chile.  That's quite a history.  The Spanish brought the potato home with them after their conquest of South America.  From Spain and other ports of Europe the potato spread across the world and today it is eaten in nearly every nation on the planet. 

One of the reasons for its popularity is that the potato is well-adapted to most climates; it can also be grown in a backyard garden in quantities adequate to provide for a family's sustenance; it grows easily; and is much less expensive than grain crops.  The potato has been a crop to grow at home for centuries, since potatoes have particular storage requirements they didn't keep as well as cereal grains and therefore were less market-worthy and more likely to be found in individual gardens.  This is part of what led to the Irish Potato Famine, the poor Irish tenant farmers fed their families on milk and the potatoes they grew on their small allocated plots.  Nearly all of the potatoes grown in Ireland at that time were a variety known for large harvests, which made sense when you were short on growing space and had a family to feed, but not at all resistant to late blight.  A particularly nasty year led to rampant infections of late blight taking out nearly one half of the potato crop in Ireland; and leading to the deaths of nearly a million Irish, and the emigration of more than a million others, effectively reducing the population by 20-25%.

Potato plants
Why mention the Irish Potato Famine in a blog post about potato gardening? Yeah, it is a little morbid.  But it's an important example of the folly of dependance on a single cultivar, or a single staple crop even.  Genetic diversity in food crops is something to be coveted, having a multitude of available cultivars offers people protection in the event of another devastating loss like the Potato Famine.  With that in mind, if you plan to grow potatoes, make an effort to try some lesser known varieties and get familiar with potatoes all over again.  One of the major reasons Russet potatoes are so common in grocery stores is not their flavor, or nutrition, or ease of production.  Can you guess why the Russet is found everywhere?  Because it can be shipped everywhere.  Russet potatoes are one of the longest-storing varieties, they can be bounced around, stored for months, and are none the worse for wear.  I am looking forward to getting familiar with my German Butterball potatoes, and learning what traits they have to offer other than shipping stability.

I recommend doing further reading on Wikipedia to learn more about the history of this plant, but I think I should move on to growing information at this point.

Potato plant in planting bag
Potatoes are grown from "seed potato" which is not a seed at all, it's a potato.  The "eyes" on a potato sprout and grow into a new plant.  You don't even need whole potatoes for this, just chop them into chunks with at least one eye on each.  Bury them in rich soil about 6-8" deep.  Keep them well-watered, with good drainage to avoid overwatering. 

Potato growth happens in 5 phases: first sprouts grow from the seed potatoes and roots begin to grow as well.  The second phase involves photosynthesis as the plant's leaves grow.  Phase 3: stolons develop from lower leaf axils on the stem and grow downwards into the ground and on these stolons new tubers develop.  Often, this phase is also when flowering occurs.  Tubers will stop forming when the temperature hits 80 degrees, this is why potatoes are considered cool weather crops.  The next phase involves the tubers growing larger.  The final phase involves the leaves and stems dying back, the skins of the tubers hardening, and the tuber sugars converting to starches.  You can harvest at this time, or during the fourth phase you can hand-harvest "new" potatoes while leaving the plant to continue growing more.

An important thing to remember about potatoes is that they are from the nightshade family and do contain small amounts of the toxin solanine.  To ensure that you don't become sick from your potatoes, never eat green potatoes.  Tubers will turn green when exposed to light; in the garden you can prevent this by keeping tubers that show above ground covered with dirt or a heavy mulch; once harvested store potatoes in a brown paper bag to reduce light exposure.  Also, after flowering the potato plant may develop fruits on it, these are toxic and should not be eaten.  For the home garden it may be best to pick all of the potato flowers when they fade to prevent accidental ingestion of the fruits by children or visitors.  Potatoes are generally cured in order to allow for skin-set, and increase storage capability.  Similar to winter squashes curing is done by setting them out in a warm, almost hot! place for several days.
Potato flowers

Potatoes make a very pretty flower and could be interplanted with annual or perennial flowers easily, without it being obvious that they are food plants.

I hope this has been as helpful to you as it has to me, and look forward to getting my potatoes started and seeing how well they do. 

Tuesday, February 28, 2012

Lettuce Culture

**most of my plant culture information comes from Wikipedia entries, opinions are all my own though.

Lactuca sativa, or lettuce, is a member of the Asteraceae family and actually makes a pretty little white or yellow flower similar to a dandelion if you allow it to bolt and go to seed.  When cut its stems ooze a milky white substance, hence the reason for the name Lactuca.  Some members of the Lepidoptera butterfly family eat lettuce.  In Ancient Egypt lettuce was considered an aphrodisiac.

Lettuce grows best in a humus rich, light soil, with constant moisture.  Lettuce prefers temperatures between 75 degrees and 45 degrees F.  A hot or dry environment may cause it to turn bitter and bolt, though this is less of a problem with certain bolt-resistant or heat-tolerant varieties.  Seeds can be direct sown into the garden or transplanted.  With a protective cover to keep lettuce from freezing it can be grown in mild climates nearly year round.

The primary types of lettuce are butterhead, romaine, crisphead or iceberg, and loose leaf.  Butterhead leaves have a buttery texture, they are similar to romaine, with less crispness and a shorter growth habit.  Romaine, or Cos, grows long leaves with a firm central rib, it is more heat tolerant than other varieties.  Crisphead, or iceberg, grows in a tight head similar to cabbage.  They have a crunchy texture and are generally the mildest flavored lettuces.  Loose leaf lettuce has tender, delicate leaves and doesn't grow a "head" but rather as a bunch of loose leaves.  Summer crisp or Batavian lettuce has a mix of traits of iceberg and loose leaf, being crunchy in texture and having only a moderately dense head.

The less bitterness a variety of lettuce has, the higher the water content, and consequently the lower the nutritional value.  All lettuce varieties will cross-pollinate easily, so be certain to allow only the cultivars you wish to harvest seed from to go to flower.

Lettuce is a fast grower, taking as little as 3 weeks to reach a harvestable size.  Remember to keep your lettuce plants moist, and protected from heat.  Slugs are the primary pest to watch for on lettuce, though cutworms can also ruin a planting by cutting the stems when seedlings first sprout.  Defeat slugs by baiting, hand picking, or laying down a copper barrier.  Protect from cutworms with a paper collar, or start lettuce indoors and move outside once they have a few true leaves on and have grown beyond cutworm edibility.  Lettuce can be grown indoors over the winter under a grow light or in a windowsill.

Mix varieties of red, green, and mixed color lettuce in a salad for a more interesting presentation.  Since lettuce varieties will cross so easily, try leaving two or three favorite varieties to cross-pollinate and see what exciting new crosses you can come up with.  For butterhead, romaine, or loose leaf lettuces harvest only the leaves you need and allow the plant to continue growth; crisphead is best harvested as a whole head. 

For planting: try planting lettuces under a fruit tree, in early spring they will receive full sun, and once the tree flowers and begins to put on leaves it will shade the lettuces leaves from the heat of the sun.  SFG suggests 4 lettuce plants per square, and they can also be interplanted between taller growing brassicas to protect and shade them.  If your tomatoes are ripening and you wish to have lettuces to go with them, try planting lettuce under the shade of the tomato plants, or in a shadier corner of the garden.  If all else fails, grow them inside during the hottest part of the year, in the cool of the AC.

You are unlikely to be able to preserve lettuce at all; it manages fine in the fridge for a few days though.  Be sure to stagger plantings every few weeks to ensure a crop all year and don't plant too many at once or you'll be swimming in fresh lettuce that HAS to be eaten, and can't be saved by preserving.

Happy lettuce growing!

Sunday, February 26, 2012

When the Men Are Away, the Women Will... Build a Grow Room?


Shelves, trays, lights, bulbs, and seedling mix.
The original shelf and all the stuff stored there.
Got my grow room set up yesterday, just like everything else it was more challenging than I expected.  The 2' light fixtures I bought were for wiring into a house and didn't have cords, plus they needed assembly which I didn't know until I opened the boxes.  So after returning them I was forced to visit two hardware stores and a Home Depot to find something that would work.  So here's a quick tip: undercabinet lights, shop lights, and aquarium lights are your best bets for fixtures.  Strip lights wire into a home and don't have cords.  Undercabinet lights are primarily less than 2' long, shop lights are 4' and longer, and aquarium lights are in between.  Since you pay close to the same amount for a 2' light as a 4' light it's more cost efficient to have a 4' space and buy one shop light (which are cheap) than to buy two 2' lights (or in my case two 18" lights).  Aquarium lights tend to be more spendy since they are rather specialized, the other advantage of shop lights is that they often come with chains to hang them.  Sadly, my space was not wide enough to fit a shop light so I had to resort to a less efficient system.

 When selecting flourescent bulbs be sure to buy the correct length, circumference, and light color.  While a standard soft white bulb will work to sprout seeds, they will become leggy fast searching for actual sunlight.  Flourescents come in varying circumferences (T12, T8, T5) and you should check the size on the fixture you choose and buy a bulb of the correct size to fit it.  My fixtures require 18" T8 bulbs.

Examples of different bulbs that would work for plant growth.
Once you find the correct size you need to select a light color as close to that of sunlight as possible.  Daylight, Full Spectrum, Wide Spectrum, Plant and Aquarium, Natural Light, or Natural Daylight are some of the names for the bulbs you need.  If you are unsure of whether a bulb will work for your starts you can check the label on the package.  Look for the "Color Temperature" on the label, it should be a number between about 5000K and 6000K.  A number higher than that will cross into the white light category and may not be adequate, while a lower number will become closer to red light and again won't serve your purpose.

Once I solved my light fixture problem I set up my shelf, moved all my junk onto it, then plugged in the power strip.  It took a bit of arranging to get the lights hanging correctly. Then I wrapped tin foil over the cardboard from the shelving box and hung it over the back of the shelf.  Finally, I planted some seeds, I will probably plant more today, but was surprised to find I could fit 29 pots of different sizes into one tray.  I may not need more than that!

Below are more pictures showing the grow room space.

The shelf all assembled, lights hung, you can't really see the tin foil but it's against the wall reflecting the light forward.  I also set my thermometer w/min max on top to watch the temps here and in the green house more easily.

Examples of reusing last year's pots, and of phone book page origami pots.

21 of my pots filled and ready to go.  I had to stop and make more paper pots.

Plastic dome over top.  Seeded, watered and under the lights.  Ready to sprout!

I could have fit 3 trays under these lights but by the time I was done last night I was not prepared to plant that many seeds.  Plus I think I'll need another bag of seedling mix first.  Be sure to keep lights positioned just above the tops of the plants, no more than 4" above them to encourage short, robust growth and deter legginess.  You can move the lights up as needed or move the plants down, whatever is easier.  Lastly I wanted to mention that while researching on plant lights I found out that plants require and grow better with both light and dark times each day, so be sure to turn your plant lights off at night and back on in the mornings, if you are too forgetful for that then set a light timer to do it for you.  Having dark time is nearly as important to plant health as having sunlight.  Good luck!


Friday, February 24, 2012

The Costs of an Early Start

Growing seasons differ across the country.  A lucky friend of mine just sent me a picture of the lemon and orange trees in her yard that are in full fruit right now, living in southern California makes a big difference I suppose.  The weather here is still touching on freezing overnight and with as mild as the winter was it would not be remiss to expect it to keep going this way for another month or even two.

I recently picked up an indoor/outdoor thermometer with min/max capabilities to keep an eye on how much the temperature in my tiny greenhouse is changing.  In the past week the minimum temperature inside the greenhouse was 33 degrees, and the maximum was 96.  Unless one of the kids slapped the thermometer with a hot potato when I wasn't looking, that means there was a more than 60 degree change in temperature just within the week.  Too cold for winter veggies and too hot for them too.  I definitely need a better greenhouse system, but I'm unwilling to invest in one since I have such limited space.  Instead the greenhouse will be used solely for hardening off, opening it up during the day and closing it on cooler nights to keep the temps from going out of control.

This has left me in need of a space to get my winter veggies started.  My brother, may his awesomeness reign forever, has agreed to start my hot weather plants for me again this year.  I plan to attempt starting the cold weather plants myself though.  With that in mind I decided to build a "grow room"... er, shelf inside.

People give you a lot of strange looks when you mention that you are building a grow room, it seems the phrasing just makes them think of growing marijuana, but in actuality it makes good sense (cents?).  Starts from a nursery are often limited to the most common varieties, and by what is in stock.  Each start you buy ranges in price from .99 to $5.00 (for gallons).  But if you have a grow room and some seeds you can effectively pay far less in the long run and have better quality plants of more varieties.  If you save your own seed it cuts the cost even further.

So let's talk about the costs of a grow room.  For cool weather plants the costs are lower than for hot weather plants, primarily because you don't have to heat them as much.  Start with a shelf, or shelves, or a tabletop, or a windowsill, anywhere you can find room to set one or more trays of pots, hang a light over it, and keep it away from things or people that could cause trouble.  You will need lighting, if it's a completely enclosed space you'll need ventilation, if it's outside of the house or you will grow hot weather plants longer than a few weeks you'll need a heat source you can monitor and adjust.  You also need trays, pots, potting soil, seeds, water, and a power source for the heat/lights/ventilation.

For example, my "grow room" will actually be a few shelves in my laundry room.  The furnace and back door are in there, and it is generally left open to the rest of the house so ventilation and heat should not be an issue.  There is a power source (the outlet the washer is plugged into) to run the lights, though I will need a power strip to use more than one light at a time.  Currently I have a small metal shelving unit in there which holds the overflow of my Costco shopping trips that won't fit in the kitchen.  My plan is to replace this with a 4 tier shelf that is wider and taller.  It will still hold my overstock goods in the bottom two shelves, but the upper two will be outfitted with lights and house my starts.

Costs:
36" wide 4 tier shelves:  $60
Power strip:  $20
2' wide single bulb flourescent light fixtures:  $10 each
2' long flourescent light bulbs (daylight or plant and aquarium):  $8 each
Plastic seedling trays:  $2 each
Organic seedling potting mix (small bag): $5 each
Aluminum foil: $5
Newspaper/reusable old pots/phone book:  $0
Cardboard:  $0

Depending on how many plants you plan to start it should have an initial cost of about $150 or more.  Nearly half the cost is just the shelving unit, which is totally reusable year after year and can be used for storage between growing seasons.  The other big cost is the power strip and it can also be used year after year, or used for other things when it's not needed for the plants.  The light fixtures and plastic trays should last you a few years too.

The things that need replacing each year are the potting mix, aluminum foil, cardboard and pots.  But cardboard is free from any recycling bin, aluminum foil is inexpensive, potting mix can be made in bulk, and pots can be made of free recycling items too.

So, to make the cost comparison, let's say you are planning to grow cabbage, broccoli, kale, onions, and carrots.  About 70 plants total.  To buy these plants already started you'd pay about $2 each for four packs of the larger veggies or 6 packs of the smaller ones.  For this price you get the smallest starts, basically a stem with its first set of true leaves.  If you want 40 of the large veggies it will cost $20 and let's say about another $10 for 30 of the smaller ones.  So you spent $30 on starts.  Not so bad really, in fact, I know I usually spend more than this... maybe I underestimated the cost.  But no matter.  4" potted starts will cost you up to twice as much for one plant.

The first year of building a grow room you will have spent $150 on the setup alone, and about $7.00 for the same five types of plants.  The difference is that a packet of kale seeds contains around 50 seeds, carrot packets contain closer to 100 or more.  So instead of 70 plants you have the ability to grow 250 plants.  You can grow spares and sell them, or trade them to other gardeners, or share with friends or family.  Or you can save all that extra seed for the next year and save yourself the seed costs.  Obviously there is no savings the first year, but the second year you only have to pay... well, nothing if you make your own potting soil from your own compost, about $5-$15 if you buy it, depending on how much you need.  And so on, for many years.  Light bulbs will need to be replaced every few years, and undoubtedly your plastic trays will eventually need replacing, but for the most part the grow room will be low maintenance and save you money in the end.

Considering I spend $150 on seeds alone, of nearly 40 different plants, if the grow room will allow me to improve their survival rate and possibly even turn a few starts into cash by selling them to neighbors or my mom at a discount I will be happy with the investment.  Two shelves of grow space alone should provide all of my cool season crops adequate room, and it could also be enough space for the hot season plants if needed (after the cool plants were moved outside).  Imagine how much you could grow in a whole room!

The other big bonus to creating your own grow room is getting ahead of the game on planting times.  In the Willamette Valley a gardener has between April 15th and October 1st to do all of their growing.  Just over 5 months.  If it takes a cabbage 60 days to reach maturity and a tomato 80 days... there just isn't enough time to plant one from seed and then follow it with the other from seed.  Working in a small space you can really increase your returns by planting the same area twice, or even three times, in one season.  With a grow room I can start my cabbages inside a month earlier than I could outside, while the soil is still too cold for germination.  They can grow larger under optimum conditions before being put outside, then finish their growth in the garden where they will have plenty of room.  This means that I should be able to have the cool weather crops (or at least most of them) harvested and pulled out in time for the hot weather plantings to go in at the beginning of June.  Then I can even start a fall crop in August when the determinate tomatoes have finished producing and the basil is harvested, leaving the longer season tomatoes to finish off before it gets cold again.

Lastly, I can use my grow space over the winter to grow entire plants for fresh eating indoors.  Spinach, lettuce, green onion, annual herbs like cilantro and basil, all of these can grow indoors over the winter.  They won't outgrow their space and can easily be harvested as needed without sacrificing the entire plant.  Inside a house they shouldn't even need extra heat to stay healthy.

P.S. I almost forgot to explain the purpose of the foil, cardboard and newspaper etc.  Backing and/or siding your shelves with a reflective surface (i.e. aluminum foil wrapped over cardboard for stability) will help keep the light and heat focused inward toward the plants and can make a big difference in plant health.  Newspaper or phone book pages make excellent paper pots, or you can reuse any old start containers from previous years, just be sure to wash them well with soapy water.  I've found that newspaper origami pots are about a 4" pot, while phone book pages make a pot closer to the size of a 2" peat pot.  Yellowbook phone books are totally recyclable and have soy based inks that won't contaminate your soil, check online to see if your phone book is made with soy based inks.  If not, stick to newspaper, which is always made with non-toxic inks.

Next time... When the Men Are Away, the Women Will... Build a Grow Room?
In which my daughter and I put together our grow room, start seeds, and then wait for my husband to notice it when he gets home.


Thursday, February 2, 2012

Spring Cleaning

February and early March are the time of year to do your yard and garden cleanup.  It's past the worst weather, you get a few nice sunny but cool days to enjoy the outdoors, and best of all the weeds haven't started growing yet.  Once the weather gets warm weeds will start their Spring growth with abundance.  This time of year is when you scour your yard for any trash blown in during winter storms, or left next to the shed last summer when you didn't have time to take it to the dump.  Get these things cleaned up, turn over your compost (especially if you're like me and rarely remember to turn it), pull out weeds in paths and beds while the soil is still damp and soft.  If you have landscape work to do, like laying new paths or putting in new beds, or decorative mulching this is also a great time to do those things.  Getting a head start on these chores means not having to worry about them when it's actually time to plant.  It also means getting ahead of the weeds, so you don't have to weed much before laying paths or mulch.  You can also do a quick trim of trees now, to save yourself the trouble of trying to do it when they're in full leaf or blossom.  For fruit trees this will improve your harvest, for other trees it just helps them to keep a neat appearance, and may remove diseased or broken limbs that could cause issues later.

This is the time of year to get the yard tidy and ready for the growing season.
Start at one end of your yard and work your way around the house getting everything in the best possible shape before the growing season begins.  Remove dead plant matter, maybe wash your windows and power wash the house; clean off the roof and gutters too.  Once all of this is done you will be in great shape to enjoy your yard all spring and summer, and you'll be able to plant, grow, and harvest without wishing you had washed off the siding before planting your new tea roses right in front of it.

This year I will be replacing the pebbles in the path around our house, they have gotten very thin and weeds overwhelm the path rather quickly.  Also the landing below the front porch steps needs new gravel, it has sunk a bit and now becomes a lake when it rains heavily, and grows weeds the rest of the year.  I also plan to bark mulch the open areas around my garden beds, and lay a few stepping stone paths to the shed and fountain there.  Lastly, if my budget allows for it (which it may not since I'm also remodeling my kitchen right now) I plan to rake out the lava rock around the front lawn and replace it with bark mulch, and lay in a pebbled path to the shed on the front side so my husband won't complain about getting his motorcycle through the mud to the shed anymore.

Monday, January 23, 2012

Perennial Herb Culture

Perennial herbs are generally the herbs with woody stalks that survive year after year.  In milder climates some soft herbs can survive for more than a year, such as chives.  Primarily the perennial herbs people think of are rosemary, lavender, thyme, oregano, sage, the mint family, and marjoram.  There are others but the culture of these plants is pretty similar between species.  Personally I don't recommend starting these plants from seed, the seeds are incredibly tiny, and a bit finicky to get started.  Plus they are available as starts everywhere and aren't terribly expensive.

Perennial herbs need a sunny spot that won't be a swamp during the wet season.  They manage pretty well in my area which is basically a temperate rain forest, but if they are in a depression and get too much water with too little drainage they can die.  I have never had a pest problem or disease problem with these plants.  In fact they have strongly scented oils that can act as repellents to some pests, and at the same time most produce a flush of flowers in spring or summer that attract many pollinators.  These herbs are a great addition to any garden, attracting bees and butterflies, smelling fabulous, keeping out pests.  They don't require any fertilization so long as they are in moderately fertile soil to begin with.  Adding nutrients early in the spring can improve the abundance of fresh growth in the springtime; but don't add more after June since they are finished with most of their growth at that point.

You can plant them in pots or in the ground around your garden, I wouldn't plant them in among your annuals though as planting new annuals each year could damage the roots of the perennials, and the perennials will spread quite a bit over time leaving your no room for the annuals after a few years.  If you put them in pots make sure to move them to a warmer spot during the winter.  I have never lost a perennial herb to frost when they're in the ground, but pots are not as insulating and I often have to replace potted herbs the next spring.
Pots of perennial herbs between vegetable beds.

Rosemary, thyme, sage, oregano and marjoram are all Mediterranean herbs; they are comfortable in hot, cool, dry or moist conditions; they will appreciate both thick clay soils and sandier soils.  In fact, I don't think I've met a soil they wouldn't grow in.  Mints on the other hand prefer a cooler spot with more moisture, sandy soil doesn't suit them well.  Different varieties of these herbs will grow in different ways also.  If you're looking for a ground cover an option to consider is a creeping or spreading version of rosemary or thyme, or a standard version of oregano.  All of these will stay low growing and spread over an area, they smell lovely and produce a sprinkling of tiny purple flowers in spring and summer.  Choosing variegated, or odd colored varieties can add some excitement as well, like lemon thyme with it's yellow and green splashed leaves, or purple sage.  For culinary use smell or taste the leaves of the plants before buying them to ensure they have the flavors you want as well as the look, woolly thyme for example is a spreading attractive ground cover but it is not as flavorful and therefore does not make a quality culinary herb.  No one will mock you for nibbling the plants at the nursery, I promise.
If you are looking for more upright growth in your herbs (for use as a back row with a fronting of bulbs or annuals, or something similar) chives grow a lively bunch of bright green onion-like tops, sage comes in a variety of colors and has a silvery fuzz to it's leaves, a standard (non-spreading) rosemary can reach 4 feet tall and act as a hedge, lavender stays fairly small and makes a great perennial border, and most varieties of mint spread by underground runner and stand up to 18 inches high.

All of these herbs can be cut fresh with a pair of scissors and added to foods, teas, or used as fragrance.  They can also be dried.  To dry herbs hold a bunch of stems in your hand no bigger than you can wrap your index finger and thumb around (if your bunch is too large the center may not get adequate air flow and can mold), tie the ends together with a string, hang in a cool, dry place where they will get ventilation.  Under the eaves of your porch, on a clothesline strung across your laundry room, wherever you can find the space.  I hang my bunches from my pot rack over the island, if my stove were underneath it I wouldn't hang them there because the heat and moisture coming off the stove could ruin the herbs.  Let them dry like that for a week or more, until the leaves are crisp and crumble under your fingers.  If in doubt about whether they are dry enough, just let them hang longer until there is no doubt.  Once they are totally dry you'll want to store them in airtight containers; either plastic bags stored in the freezer or in spice jars in the cabinet.  Either way you will save a lot of space by stemming the herbs and giving them a quick grind with a mortar and pestle or spice grinder. you can continue to hang your herbs in their bunches but they will lose flavor faster and can get a build up of dust on them if left for long.

My favorite way to deal with my dried herbs is to throw together some Italian seasoning, one of the spice mixes I use most often.  First I get my herbs all prepped for putting in jars or the freezer, then just mix together  roughly equal parts rosemary, thyme, oregano, basil, and marjoram.  Then store in a glass spice jar labeled Italian Seasoning.  If this blend isn't to your taste you can also add in savory, or red pepper flakes if you prefer it a little spicy, some people also add garlic, onion, or parsley.  I prefer to keep it a simple blend and add those extras only for certain dishes, or if I have no fresh onion or garlic.

20 year old rosemary at Dad's, rhododendron behind.
Some other great ways to use these plants include: lavender sachets, dried catnip for pets, herbal soaps and lotions, potpourri, rosemary barbecue skewers, sage smudging, teas, mint sprigs in drinks, and medicinal tinctures and teas.

Thursday, January 19, 2012

Tying Up

There are many reasons to trellis plants, and many different ways to do it.
One reason to trellis a plant is for looks, a pile of morning glories strewn across the ground isn't nearly as attractive as a teepee of trellised morning glories, or a chain link fence blooming with sweet peas.  But looks are not the primary reason to lift your plants up to a higher level.  Trellising, staking, or tying up plants lifts them off the ground; it allows them to receive better light, keeps them from taking up more garden space, keeps them away from the wet ground and out of reach of some pests.  Supporting plants also helps to keep taller plants from blowing over in the wind when they are young and keeps them growing straight and tall.
By lifting peas up onto a trellis you provide a support that keeps the leaves out of contact with moist spring soil that can lead to fungus and mold problems, you ensure that the peas will get adequate sunlight despite other low-growing plants nearby, and you keep the sweet tasty pods out of reach of slugs and other non-flying pests.  You also save a lot of space.  Peas are one crop that is well-known to need a support of some kind, and while one square foot of soil can support 8 peas plants, those same pea plants if not supported would spread out in a mass three feet by three feet.  What a waste!
So yes, providing a support of some type is essential for many plants.  Among the plants that require support are peas, pole or runner beans, indeterminate tomatoes, morning glories, grapes, sweet peas, clematis, and all vines.  While these plants really need to be supported there are many others that benefit from support as well.  Winter squashes (including pumpkins), cucumbers, melons, sunflowers (sometimes they need a little help to keep winds from blowing them down), roses, luffas, etc.  Basically anything that grows more than two feet high/long could probably use some support. 

Whiskey barrel and tomato cage with eggplant, Thai chili, lemon cucumber and Tigger melon. 7/2011
In my experience there are a few types of plant supports you should have in your garden; trellises, both strong permanent ones and lightweight temporary ones; stakes; and cages.  A trellis is some type of net stretched across an area, it can have large openings in the netting (such as the 7" squares in my pumpkin trellis) or small openings.  It generally needs to be attached to some sort of sturdy frame, like a fence, or electrical conduit, or a wood frame, or even PVC pipe.  A chain link fence makes an excellent trellis for all but the largest of fruits; it has a strong frame to it and medium-sized openings to allow the plants to twine in and around while still offering enough room for fruits to grow without being squeezed in the chain.  Peas, beans, cucumbers, and many vines and flowers are all good options to grow along a chain link fence.  Sadly, I have a solid wood fence in my garden.  I add my own trellis to this fence (plastic bird netting stapled to the wood in the corners) for peas and beans.  Pumpkin trellising required a little more strength, so after a quick trip to the hardware store I built the pumpkin trellis out of 2- 6' long electrical conduit pipes, 1- 4' long conduit pipe, 2- 2' long pieces of rebar, 2- 90 degree conduit connections, and a large holed nylon (much stronger than plastic netting) net.  I drove the rebar about halfway into the ground on either side of my planting bed, connected my electrical conduits with the 90 degree connectors in an upside down U shape, and slipped the conduit ends over the rebar tops.  Then I just tied the netting tightly around the conduit pieces and slowly trained the growing pumpkin plants up over the trellis.  It is a very strong and stable trellis, yet can easily be removed and relocated by lifting the frame up off the rebar and pulling out the rebar; it can also be broken down by turning a few screws to store in a small space over the winter.  If you plan to make a trellis like this one you can find detailed directions for it in the All New Square Foot Gardening book by Mel Bartholomew.
One of the reasons I chose to use the lightweight plastic netting for my peas and beans is that they tend to become a large tangled mass by the end of the summer and pulling that mass loose from a strong netting is a royal pain.  Instead I can just cut the plastic or tear down the whole thing.  Though I think this year I will replace that net with a biodegradable version so that I can simply toss it all into the compost pile at the end of the season.  Some people dangle lines of string down to beans; I love the idea, but my beans haven't been very cooperative about climbing them without a lot of assistance, so I prefer a net.

Stakes: Stakes come in different materials, lengths, and diameters; for most plants that need staking you will want a stake no smaller in diameter than your index finger.  You can buy bamboo, wood or plastic stakes; I tried all of them and was surprised that I preferred the plastic ones. Bamboo was too flexible and the plant weight bent them, wood rotted too fast. You can also create your own stakes from things you have around the house, sticks, dowels, PVC pipe, rebar, anything you can tie a plant to.  You should select stakes about 4 to 6 feet long. Stakes are very useful supports for taller plants on which the stems are a little weak at first, or that produce large fruits that may weigh them down.  I stake young tomatoes, peppers, sunflowers and a few other things.  In my area we do get high winds late into the spring at times and staking these new transplants keeps them from being blown over.  Once tomato fruiting begins I tie all of the side branches to the stake as well as the center stalk so that large fruits won't break the branches, and to keep branches from drooping down to the ground or over nearby plants.

Cages, generally called tomato cages, are perfect for trellising cucumbers and other curcubits.  They are generally made of metal or sometimes plastic, while the metal ones will rust over time I prefer them to the plastic ones; I also prefer the square cages that can break down for storage over the round cone-like ones.  Cages will work for tomatoes, but when plants get large it often becomes difficult to find and pick fruits that are deep inside the cage.  Cucumbers tend to vine and will happily grow around the outside of a cage, leaving all of the fruits out where they are easy to reach.  This is a great way to grow cucumbers or melons in a small space like a pot.  My whiskey barrels were nearly invisible under their cuke covered cages last year.  Each barrel had a cage stuck in the center of it, and a cucumber, Tigger melon, pepper, and eggplant planted around the outside of the cage.  I tied the eggplant and pepper to the bottom rung to act as a stake, then wove the cucumber and melon vines around the cage.  Those were the healthiest, best fruiting, largest cucumber plants I've ever grown. I will definitely do the same again this year.  One of the biggest issues for cukes in my region is powdery mildew, the fleshy leaves are very susceptible and once it starts it is difficult to stop the spread of the disease.  By wrapping a cucumber around a cage or over a trellis, you keep the leaves and fruits up away from the ground and the moisture left behind by watering, protecting it from powdery mildew.  In addition, I saw a much better pollination rate in my caged cucumbers; the flowers were held up high in plain sight for pollinators and for the wind to spread the pollen as well.
Cucumber in whiskey barrel 7/2011

In conclusion... tie your plants up!!  If tying up a plant is an option, it's probably a good one.  If I had my way I'd develop a vining lettuce that I could trellis up out of the slugs' reach, but for now I'll just keep crying over chewed lettuces.

Tuesday, January 17, 2012

Working With Obstacles

So you are creating your garden, planning beds and plants and maybe some decor, a comfy spot to enjoy it... then you come across an Obstacle.  Anything that gets in the way of the flow of your garden space or your enjoyment of it, or blocks light or walkways, is an Obstacle.  My yard is full of them, your yard probably is too.  some Obstacles can be removed, others can be worked around, but even better is turning the Obstacle into a focal point and highlight of the garden.
An ugly shed turned into a pumpkin patch.
The biggest eyesore in my garden, an obstacle that blocks light to the side yard completely, and cramps my garden space is our ugly old shed.  It leaks and is rusty and needs to be replaced, but until I'm ready to take on that task, and expense, it has become my pumpkin patch.  In an earlier post I mentioned that I had grown pumpkins in a 4'x4' bed, 6" deep.  It's true, not only that, but the same space provided a row of runner beans, a HUGE zucchini plant, a few lettuces and some marigolds and calendula. I used some of the techniques found in the Square Foot Garden system to keep the bed small, while filling it with "Mel's Mix" for the best possible combination of moisture retention, nutrition, and drainage.  Lastly I built a trellis system.  The pumpkin bed had two open sides, one side that backed against the fence, and one that backed against the shed.  On the fence side I used lightweight chicken wire and plastic trellis to run the beans up, covering the fence side entirely in a carpet of beans, leaves, and flowers.  The pumpkins were planted on the shed side and trellised up a nylon 7" square net tied to electrical conduit poles.  The entire pumpkin trellis cost me about $25 to build, and while nylon is very strong it will wear out over time; but the frame will never wear out.  I can reuse that trellis frame for years on end, it is easily removed and set back up if needed, I plan to build many more of them in the near future.  (You can find the specific directions for building this trellis in the SFG book by Mel Bartholomew, which I found to be a wealth of great ideas).  The pumpkin trellis supported 3 pumpkin plants that grew up over it and onto the roof of the shed.  From those plants I got a total of 5 pumpkins, with a total weight of about 75 lbs.  The largest was 33 lbs.  More importantly, I was able to grow pumpkins in an area I didn't think was big enough, kept the shed from being an eyesore, and the pumpkins were up off the ground; far from rodents, slugs and other pests, getting great sunlight, away from kids and pets.  I will never grow a pumpkin on the ground again!  The one caution I will offer in regards to this system is that growing large pumpkins like the Cinderella variety I grew you run the risk of the fruit weight breaking the trellis strings and the fruit falling to the ground.  One of my pumpkins did this, luckily it was nearly ripe and I heard it fall so was able to process it immediately and salvage most of the fruit.  It reached 17 lbs. before the string snapped and if it had been on the shed instead of dangling on the side, or supported with something more than the one nylon strand it never would have fallen.  Everyone who saw my garden last summer exclaimed over one of two things: The pumpkins on the shed, and the massive sunflowers.  No one mentioned that the shed could use a paint job. ;)
When working with an obstacle if it can't be removed, or worked around, try finding a way to incorporate it into your design.  Turn a stump into a plant stand for a huge pot of nasturtiums, hang trellis netting on a fence and make it a wall of green, grow pumpkins on top of a broken down car, or if you have a massive patch of empty where no one goes?  Throw a few different packs of squash seeds out there and see what happens.  I actually plan to do the last one with the side yard near our compost pile this year.

Growing In a Shoebox, or Whatever

3 tomato plants growing in old recycling bin
I've mentioned already that I grow in the ground, raised beds, whiskey barrels and pots.  You can grow a plant in anything tho.  For full-sized annuals any container that is at least 6" deep and 1' around with drainage holes will grow all but the largest of plants.  Last Spring I found I had too many tomato starts and not enough garden space, so I put 3 of my tomatoes into an old recycling bin that was laying around.  If you want a fancy garden with attractive planters by all means go to the store and pick up a few, but if appearance is less of a concern than plant growth, get creative.  Remember to choose products that won't break down when wet, and that won't leach toxic chemicals into the soil and plants.  I've seen people plant directly into bags of compost, slicing holes in the bag to insert the plants.  If you live in a colder climate this would be a great way to get tomatoes started a bit earlier, the plastic bag will keep the soil inside heated and a supported plastic cover will warm the air around the plants on chilly days.  Equally good items to use as pots are: old Easter baskets lined with black plastic (with a few holes in the bottom), old cooking pots (again with holes poked in the bottom), buckets, small trash cans, rubber boots, etc.  For starting seeds I have heard that egg containers work well and the starts can be transplanted without removing them if the carton is cardboard.  It will break down in the soil just fine.  My brother came up with an idea last year that worked out nicely as well.  He spent his winter evenings making 4" paper pots origami-style out of newspaper then planted seeds into them and when the weather warmed he planted them in the garden, pot and all.  This system cut down on the cost of seed starting by quite a bit, all that was needed was a small amount of "Mel's Mix", some newspaper, and a plastic tray to stand the pots in.  Be creative, think about the things you have on hand, or in your recycling bin.  Plant wherever you can find a spot.